QuickBooks has been added as one of our financial integrations. This integration will allow you to transfer your employee data and journal entries from ZenHR to your QuickBooks account based on your defined Journal Entries Structure.
Note: To set up or edit how you would like your journal entries to be created, including how to match your journal entries, how many employees you wish to include, and how to group and generate them, follow the steps in this support article Journal Entries Structure article.
TABLE OF CONTENTS
- Integrate Your ZenHR Account With QuickBooks
- ZenHR-QuickBooks Integration Setup
- Using the Integration
- Troubleshooting
Integrate Your ZenHR Account With QuickBooks
User Menu → System Preferences → Integration Setup → Marketplace Integrations → QuickBooks Setup
The new integration setup page, QuickBooks Setup, allows you to integrate your ZenHR account with QuickBooks using Oauth 2 authentication. This page will allow you to send and update all your employee data, as well as send journal entries to QuickBooks.

ZenHR-QuickBooks Integration Setup
To activate Quickbooks's built-in integration on ZenHR, the first step is to create a user token within Quickbooks. This process begins by creating an integration app to generate the client ID and secret.
The user token is essential for establishing a secure connection between Quickbooks and ZenHR, ensuring seamless data and functionality transfer between both systems.
Generate Client ID/Secret (QuickBooks)
Go to Intuit Developer website and log in to your QuickBooks account.

- Open “My Hub“ menu, and select “App Dashboard“

- Click on “+” to add a new app, and the below page will appear.

Click on “Get Started“ to start adding your app details.
Insert your App name, then click on Next.

- In the permissions page, select the permission “Accounting“, then click the button Done.

- A popup message will appear to confirm the selected permission.

- Click “Confirm”, and the below page will appear to allow you to get the needed Client ID & Secret for testing purposes, Save them.

- Click on “Open app“, to access your app details and to activate the app on production.

To be able to unlock and get the needed credentials for the first time, you will have to complete the listed tasks as shown below:
- Profile

Agreement & Privacy Policy
Add these Links:
End-user license agreement URL : https://www.zenhr.com/en/terms
Privacy policy URL : https://www.zenhr.com/en/privacy-policy

Hosting URLs
Add these Links:
Host domain : app.zenhr.com
Launch URL: https://app.zenhr.com
Disconnect URL: https://app.zenhr.com

App Categories
Check the Boxes below:
Accounting
Employees and Payroll

Your Company Industry
Check Non of the above Box

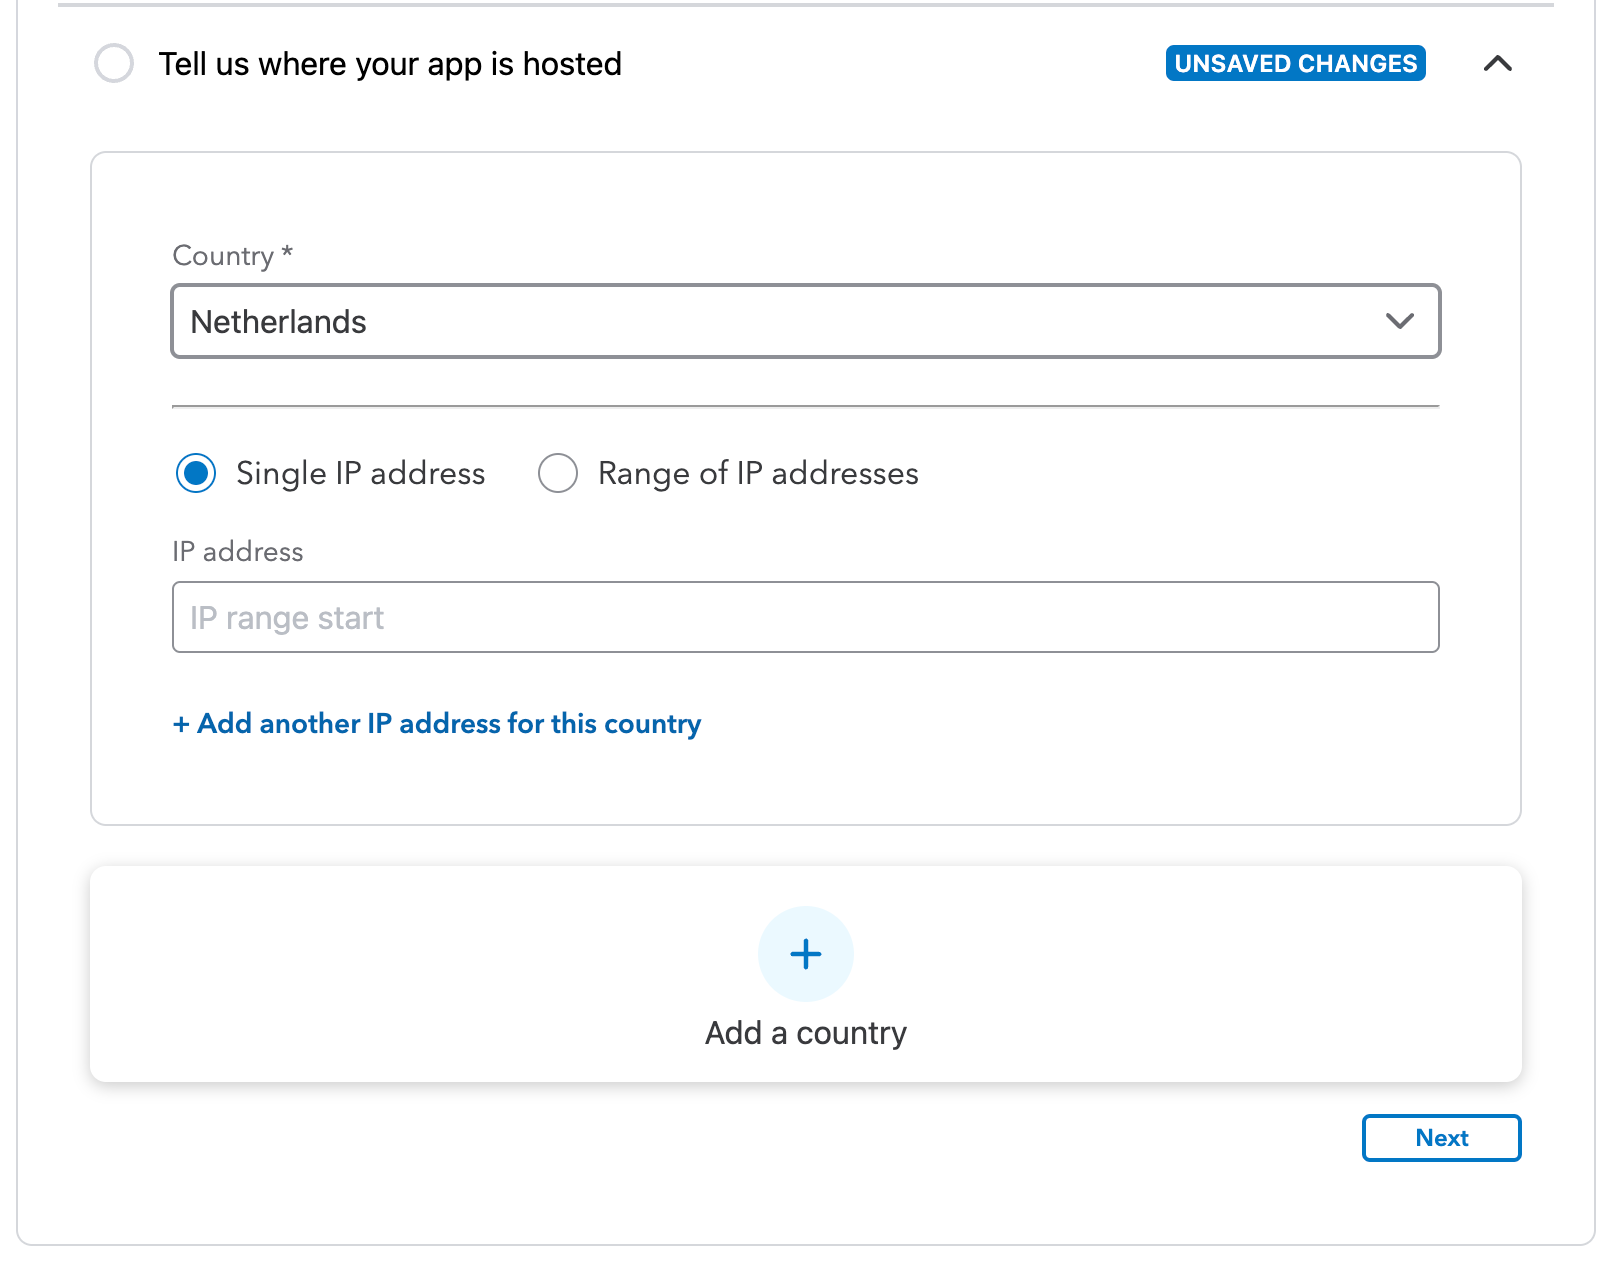
App Hosting
Enter Country only
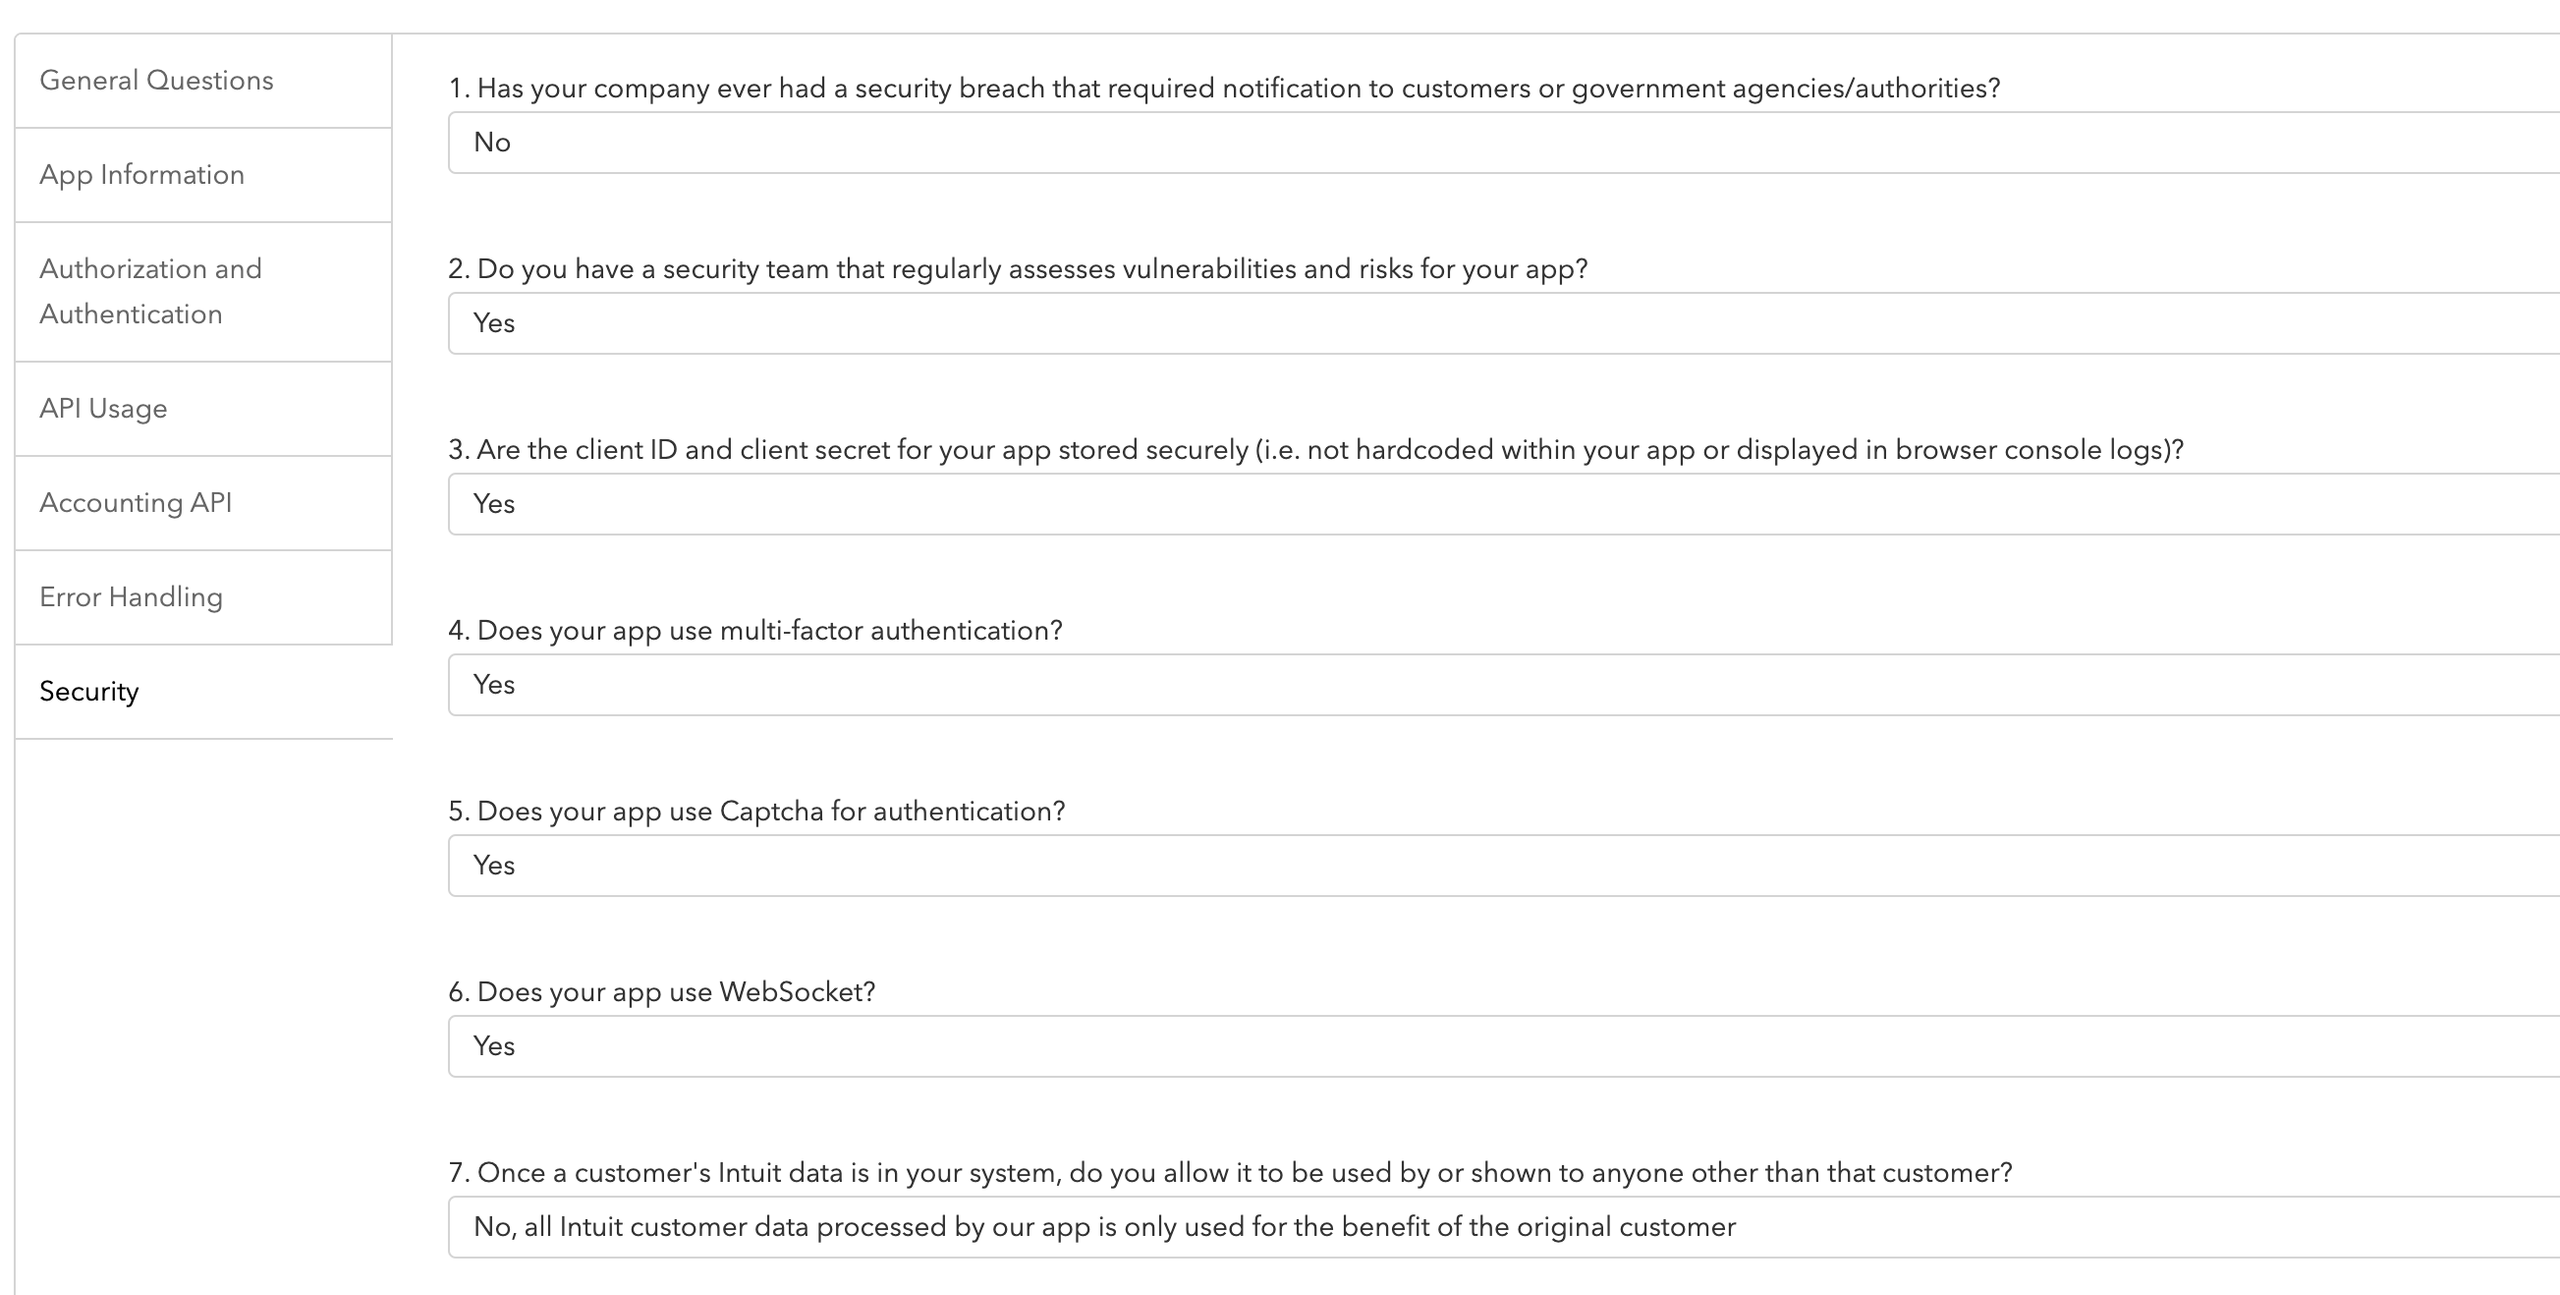
Compliance Questionnaire
After completing the tasks, and to be able to unlock the credentials on production, make sure to complete the compliance questionnaire .

General Questions
Fill these based on your company information

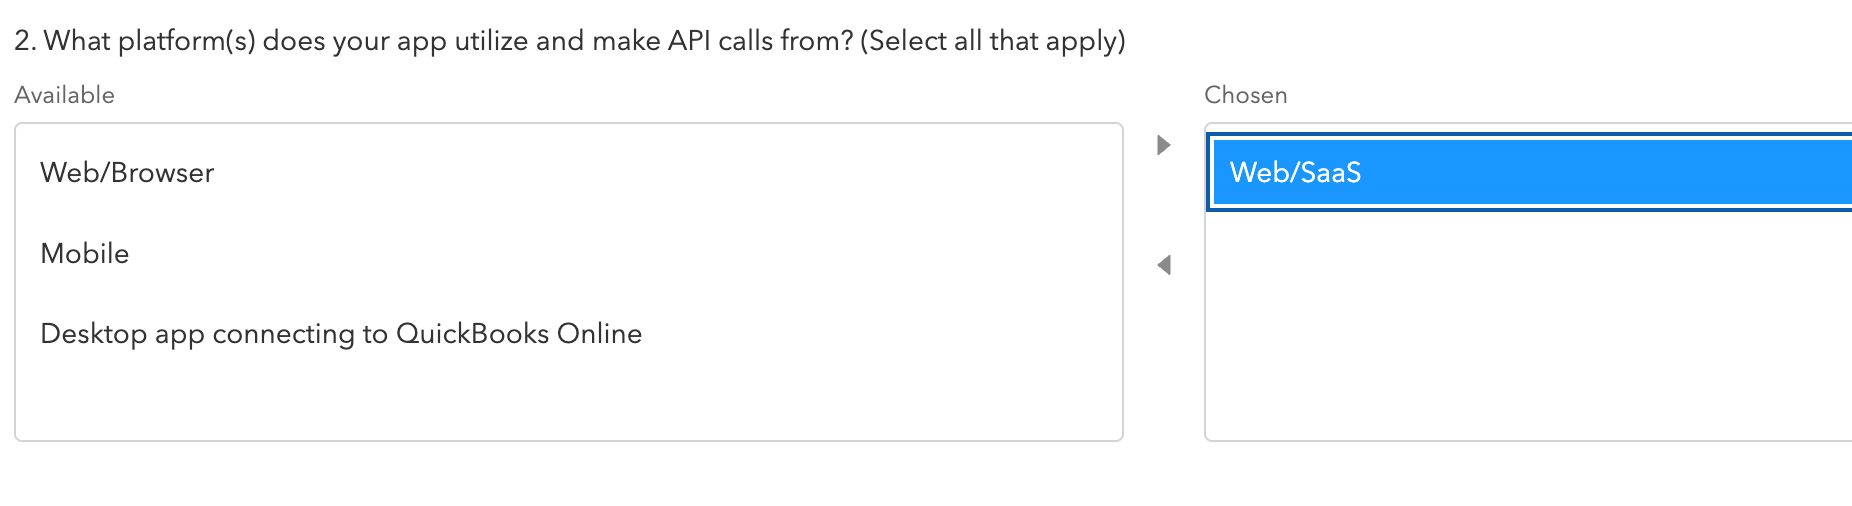
App information
Check Only the CheckBox below:

Select Web/SaaS and press on the Arrow to Select it
Select the Option below and press on the Arrow to select it
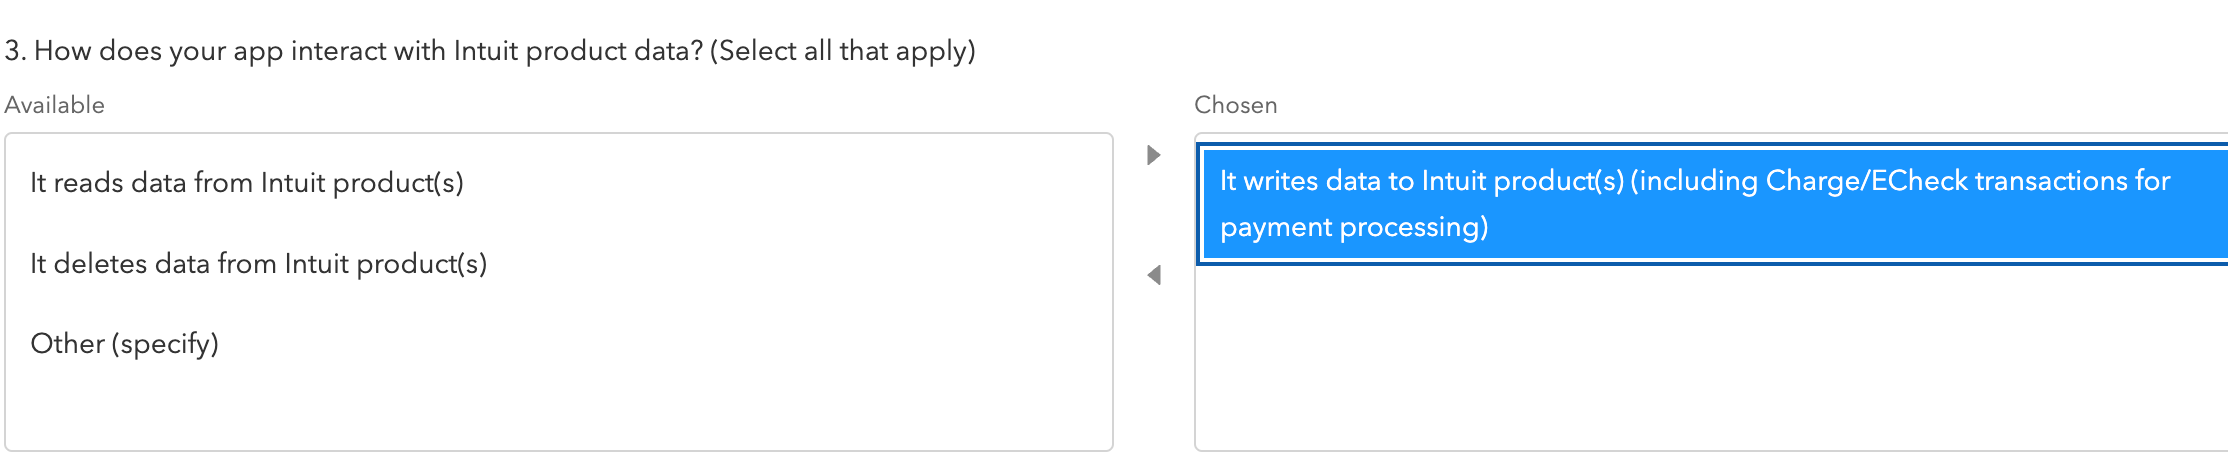
Select as Below

Authorization and Authentication


API Usage

Accounting API
After choosing “ Yes “ in the 2 Question insert this sentence:
“ We Have validations to handle such cases “


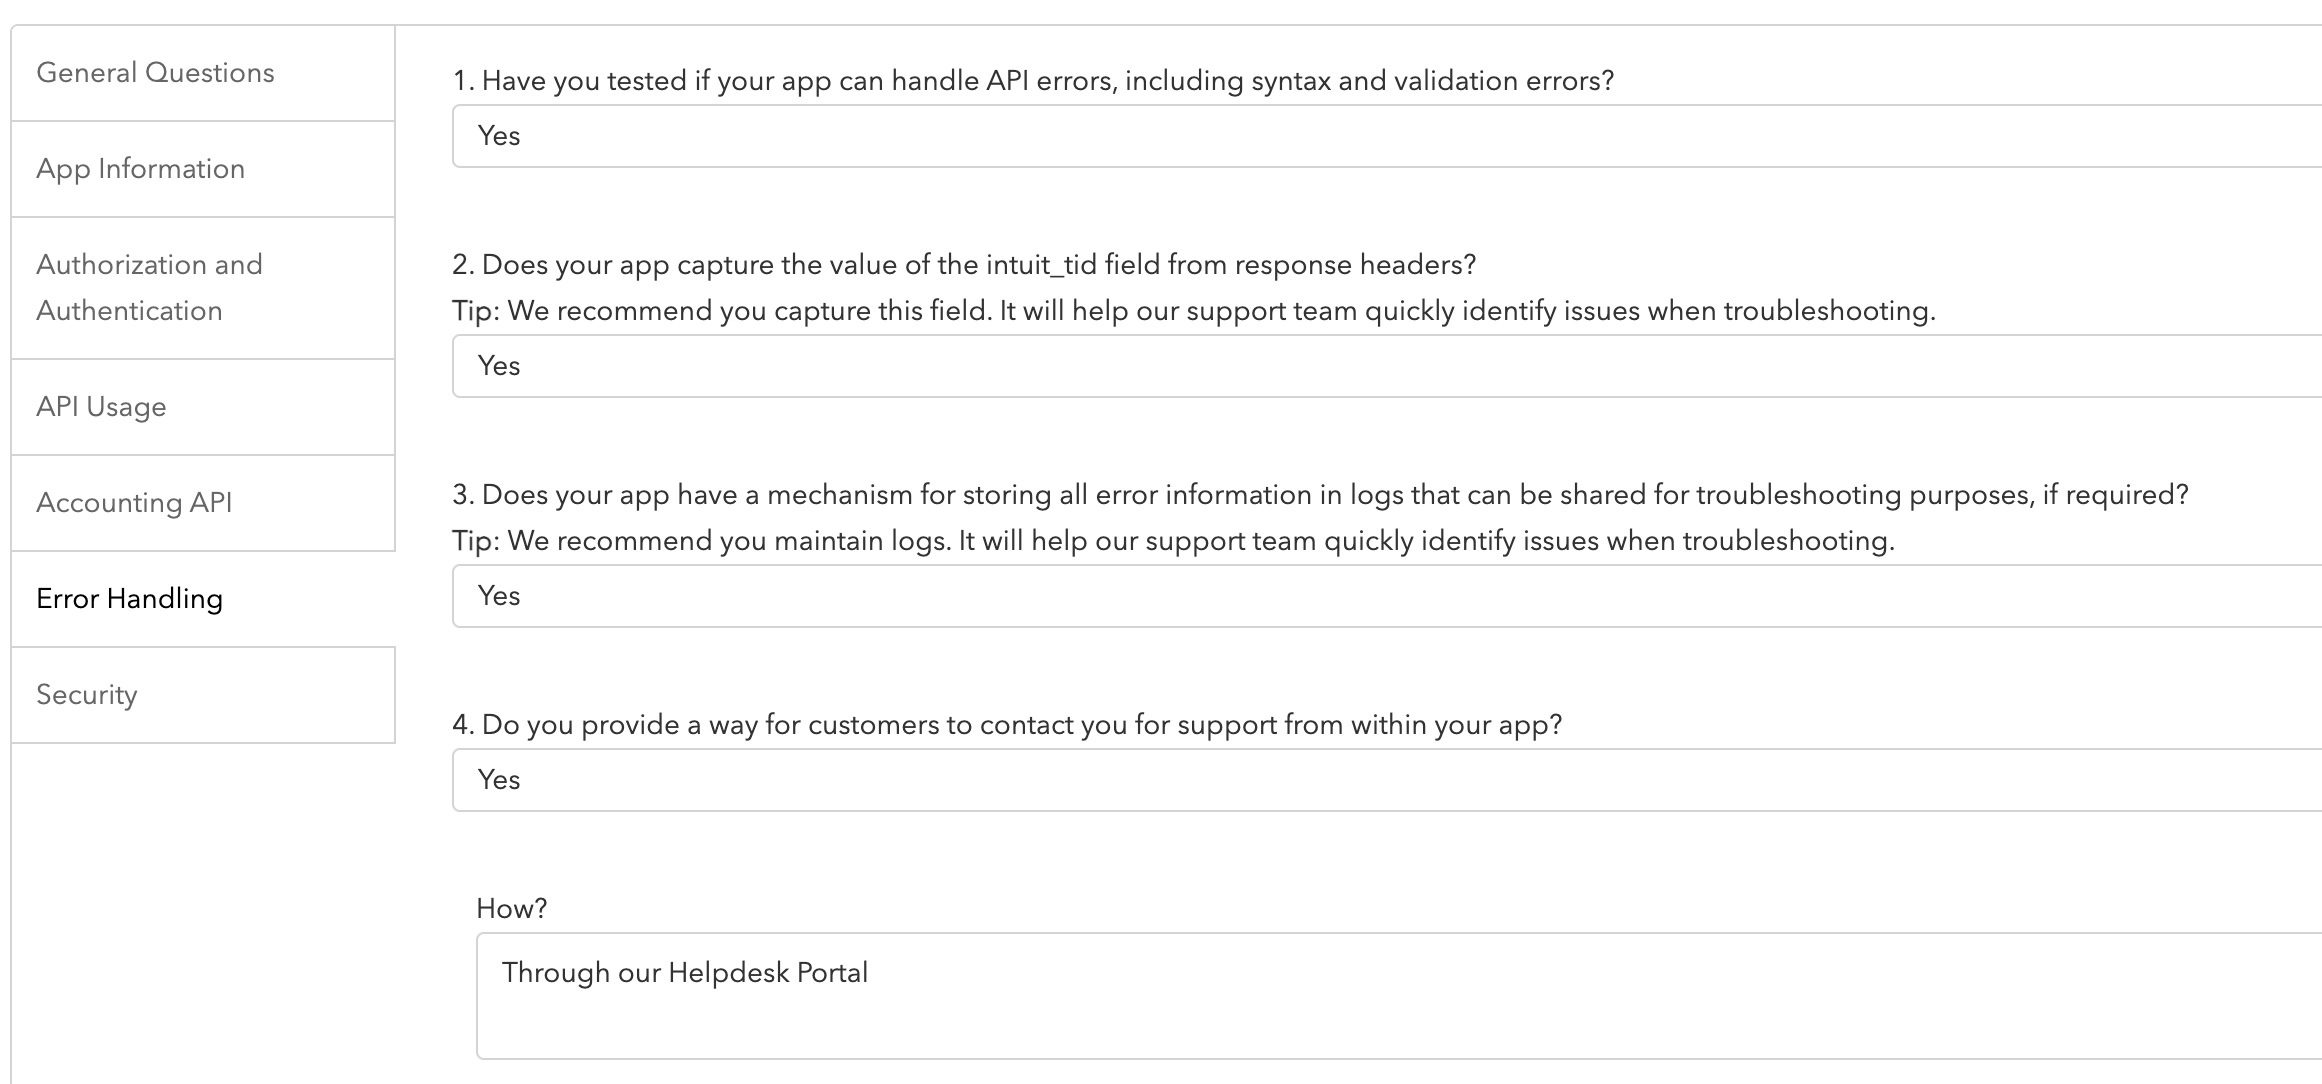
Error Handling
In the “ How ” Section Enter this Sentence:
“ Through our Helpdesk Portal ”
After completing the questionnaire, the production credentials will be unlocked and you will be able to copy it to use it for Quickbooks integration with ZenHR.

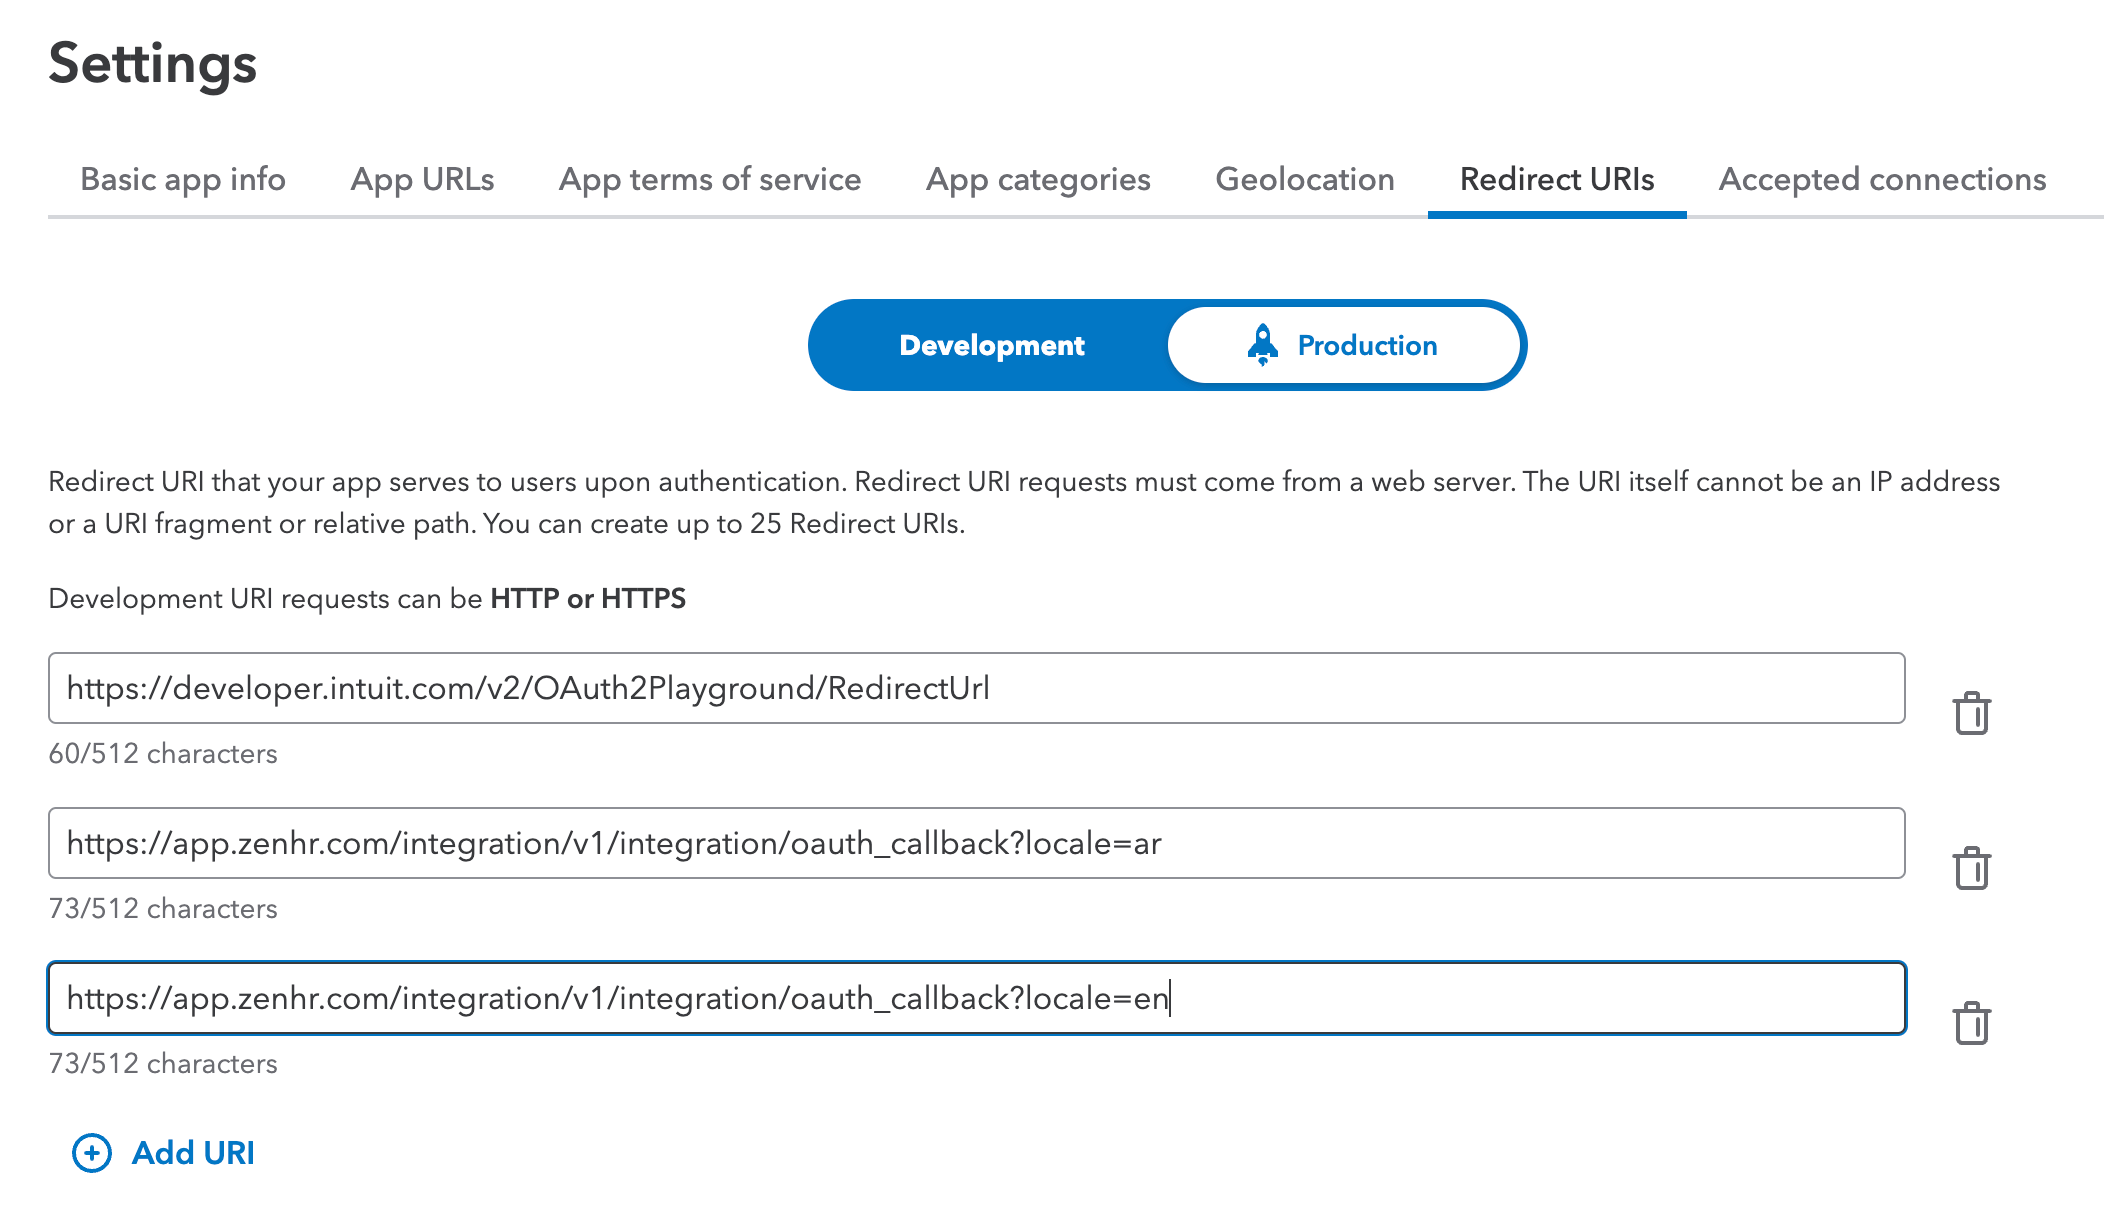
Insert Redirect URI
Enter the Settings

Then Press on Redirect URIs and insert both Redirect URI’s as shown below
Click on the “Add URI” button and enter the below redirect URIs:
Create API Key (ZenHR)
Go to User Menu → System Preferences → Integration Setup → API Keys and click on Add API Key

Add the API key name and choose the authentication type OAuth 2

Fill in the Client ID & Secret generated from Quickbooks, and click on Create.

Activate Integration (ZenHR)
Select the API key that you created previously, and activate the toggle in the Employee and Journal Entry section, then click on the Save button.

After saving the setup, the button “Connect to Quickbooks“ will appear on Quickbooks setup page.

Upon clicking the "Connect to Quickbooks" button, you will be directed to the Quickbooks platform. Here, you can log in with your account details and choose the specific subsidiary you wish to connect. Once this selection is made, the integration process will be successfully completed.
Using the Integration
Set Up GL Accounts:
Add Payroll GL Accounts on ZenHR:
Click your user icon on the upper right corner and go to Marketplace Integrations → Quickbooks Setup → Gl Accounts
Select the relevant GL Accounts using the dropdown list.
Then click “Update”.

To add Financial Transactions GL Accounts:
Navigate to System Preferences → Financial Setup → Financial Transaction Types → Income & Deductions.

To Integrate Financial Transactions GL Accounts:
Click your user icon on the upper right corner and go to Marketplace Integrations → Quickbooks Setup → Gl Accounts → Incomes & Deductions Tab
Insert the Gl Identifier and Clearance account from the dropdown list.
- Then click “Update”.

To add Loans GL Accounts:
Navigate to System Preferences → Financial Setup → Financial Transaction Types → Loan Types.
Then press the button "Add".

To Integrate Loans GL accounts by following these steps:
- Click your user icon in the upper right corner and go to Marketplace Integrations → Quickbooks Setup → Gl Accounts → Loans Tab
- Open the Loan Type by clicking “Edit” on the Loan Type record.
- Enter GL Identifier and Clearance account.
- Then click “Update”.

To add Overtime GL Accounts:
Click your user icon in the upper right corner and go to System Preferences → Financial Setup →Financial Transaction Types → Overtime Types
Then press the button "Add".

To Integrate Overtime GL accounts by following these steps:
- Click your user icon in the upper right corner and go to Marketplace Integrations → Quickbooks Setup → Gl Accounts → Overtime Tab
- Open the Loan Type by clicking “Edit” on the Loan Type record.
- Enter GL Identifier and Clearance account.
- Then click “Update”.

To add Vacation in-advance salaries GL account:
- Click your user icon in the upper right corner and go to System Preferences → Financial Setup → Vacation In-Advance Salary Setup
- Then click “Update”.

To Integrate Overtime GL accounts by following these steps:
- Click your user icon in the upper right corner and go to Marketplace Integrations → Quickbooks Setup → Gl Accounts → Search for Vacation
- Enter GL Account.
- Then click “Update”.

That’s it; your QuickBooks Integration will now be complete! You can now post journal entries directly from ZenHR.
Sync Employee Records:
Upon activating the integration, employee records will automatically transfer or update on Quickbooks when you create or update employee data on ZenHR.
To locate current employees on Quickbooks, navigate to Main Menu > Employees
Management > Employee Profile on ZenHR, then modify the employee personal info by entering the unique internal ID from Quickbooks into the field “Integration ID“, The required information can be retrieved through the documentation available on the Intuit Developer portal at https://developer.intuit.com/app/developer/qbo/docs/api/accounting/all-entities/employee by querying the Employee IDs "select DisplayName,id from Employee". Alternatively, you may consult your vendor or technical team for assistance.

Post Journal Entries
Posting Journal Entries
Upon activating the integration, you will be able to transfer journal entries for salaries, off-cycle financial transactions, employee settlements, company contributions, expenses, and provisions from ZenHR to your Quickbooks account.
Set Up Journal Entries Structure
Before initiating the transmission of journal entries from ZenHR to Quickbooks, it is essential to configure the Journal Entries Structure. This setup enables you to specify the types of journal entries for transfer, whether they are detailed on an employee level or summarized by a specific cost center, and if they should be dispatched automatically or manually. To accomplish this, please adhere to the following steps:
On ZenHR, go to System Preferences → Integration Setup → Journal Entries Structure.
Set up the way you would like your journal entries structured by completing the following fields, then click “Save”.

Journal Entries Structure Descriptions:
Field Name | Options | Field Description |
Match journal entries using: | Clearance Accounts | Clearance accounts will be added to match the credit and debit in the journal entries. |
Accrued salary differences | Salary records will be accrued to match the credit and debit in the journal entries. This will only be applied to payroll, off-cycle payments, & vacation in-advance journal entries, while other journal entries will use clearance accounts to match the debit with credit. | |
Maximum number of employees per journal: |
| Select the maximum number of employees to be included in each journal. |
Journal type: | Detailed | A detailed journal type will consist of the amount of each transaction for each employee listed in the journal entries.
|
Summary | A summary journal type will include the total amount of transactions grouped by branch, department, project, section, work location, or hierarchy group. | |
Grouped by: |
| If the selected journal type is summary, select how you'd like to group your journal entries. |
Generate a separate journal for each group: |
| If this box is checked, a separate journal will be created for each group selected. |
Auto-generate separate journals for: | Off-cycle payments | If this box is checked, a new journal for off-cycle payments will be automatically generated when payroll journal entries are generated through the Manage Salaries page. Otherwise, the user can manually generate journals for off-cycle payments through the Manage Financial Transactions page. |
Off-cycle vacation in-advance salaries | If this box is checked, a new journal for off-cycle vacation in-advance salaries will be automatically generated when payroll journal entries are generated through the Manage Salaries page. Otherwise, the user will be able to manually generate journals for off-cycle vacation in-advance salaries through the Manage Vacation In-Advance Salary page.
| |
Generate separate journals for: | Company expenses
| If this box is checked, all company expenses will be added to a new journal instead of being included in the payroll journal entries.
|
Company contributions | If this box is checked, all company contributions, such as social security and health insurance, will be added to a new separate journal instead of being included in the payroll journal entries.
| |
Calculate employees’ provisions:
|
| If this toggle is activated, the system will automatically calculate employees' provisions when salaries are calculated. The financial integration Status on the Manage Salaries page will be “Calculating provision”. When the provisions are successfully calculated, the status will be “ Not sent”. |
Include in payroll journal entries | If this option is selected, employees' provisions will be included in the payroll journal entries.
| |
Generate a separate journal for employees' provisions | If this option is selected, a separate journal for employees' provisions will be generated when payroll journal entries are generated through the “Manage Salaries” page. | |
Generate a separate journal for each provision type | If this option is selected, a separate journal for each provision transaction type will be generated when payroll journal entries are generated through the “Manage Salaries” page, such as air tickets, STBs, vacation compensation, and extra salaries.
| |
Activate journal entries exporter: |
| If this box is checked, you’ll enable journal entries to be exported as Excel sheets through the “Export Journal Entries” button on these pages:
|
Posting Payroll / Salaries from ZenHR to Quickbooks
On the left side of the page, go to Main Menu → Payroll → Manage Financials → Manage Salaries.
Calculate the Salaries.
After calculating filter the desired salary year and month for all employees, and click “Filter”.
Then click “Send to Quickbooks”, and your salaries will be transferred as journals.


To auto-generate separate journals for off-cycle payments and post them with your payroll journal entries, follow these steps:
Click your user icon in the upper right corner and go to System Preferences → Integration Setup →Marketplace Integrations → Journal Entries Structure.
Activate the Auto-generate separate journals for off-cycle payments checkbox and click “Save”.
You can then post salaries from ZenHR to QuickBooks, and the transferred journals will include separate journal entries for your off-cycle payments.

To manually generate your off-cycle payments journal entries, follow these steps:
Click your user icon in the upper right corner and go to System Preferences → Integration Setup → Journal Entries Structure.
Clear the Auto-generate separate journals for off-cycle payments checkbox and click “Save”.

Go to Main Menu → Payroll → Manage Financials → Manage Financial Transactions → Off-Cycle Payments
Use the “Date from” and “to” filters to filter out the duration of the transactions you wish to include in your journal entries, and click “Filter”.
In the Employee ID column, select the transactions you wish to include in your journal entries.
Then click “Send to QuickBooks”, and your off-cycle payments will be transferred as journals.

Post Off-Cycle Vacation In-Advance Salaries From ZenHR to QuickBooks
To auto-generate separate journals for off-cycle vacation in-advance salaries and post them with your payroll journal entries, follow these steps:
Click your user icon in the upper right corner and go to System Preferences → Integration Setup →Marketplace Integrations → Journal Entries Structure
Activate the Auto-generate separate journals for off-cycle vacation in-advance salaries checkbox and click “Save”.

You can then post salaries from ZenHR to QuickBooks, and the transferred journals will include separate journal entries for your off-cycle vacation in-advance salaries.
To manually generate your off-cycle vacation in-advance journal entries, follow these steps:
Click your user icon in the upper right corner and go to System Preferences → Integration Setup →Marketplace Integrations → Journal Entries Structure.
Clear the Auto-generate separate journals for off-cycle vacation in-advance checkbox.
Then click “Save”.

Go to Main Menu → Payroll → Manage Financials → Manage Vacation In-Advance Salary.
Filter out the vacation in-advance salaries that fall within a specific time period by using the “In-advance from date” and “In-advance to date” filters.
Select “Off-cycle” under Payroll status and click “Apply Filters”.
Then, under the Employee No. column, select the in-advance salaries you wish to include in your exported journal entries. Or you can select all the filtered salaries by clicking the “Select all” checkbox.
Then click “Send to QuickBooks”, and your off-cycle vacation in-advance salaries will be transferred as journals.

Posting Provisions From ZenHR to QuickBooks
To auto-generate journals for provisions and post them with your payroll journal entries, follow these steps:
Click your user icon in the upper right corner and go to System Preferences → Integration Setup → Journal Entries Structure
Activate the Calculate employees' provisions toggle.
Activate the Auto-generate journal entries for employees' provisions toggle.
Then select the desired option under “How to generate provision journal entries”.
click “Save”.

You can then post salaries from ZenHR to QuickBooks, and the transferred journals will include journal entries for your provisions.
To manually generate provisions journal entries, follow these steps:
Click your user icon in the upper right corner and go to System Preferences → Integration Setup →Marketplace Integrations → Journal Entries Structure.
Activate the Calculate employees' provisions toggle.
Deactivate the Auto-generate journal entries for employees' provisions toggle.
Then select the desired option under select “How to generate provision journal entries”.
Click “Save”.

On the left side of the page, go to Main Menu → Payroll → Manage Financials → Manage Salaries.
Filter the desired salary year and month for all employees, and click “Filter”.
Then click the“Send to QuickBooks” drop-down menu and click on “Provisions journal entries” and your provisions will be transferred as journals.

To manually generate provisions journal entries, follow these steps:
Click your user icon in the upper right corner and go to System Preferences → Integration Setup → Journal Entries Structure.
Activate the Calculate employees' provisions toggle.
Deactivate the Auto-generate journal entries for employees' provisions toggle.
Then select the desired option under select “How to generate provision journal entries”.
Click “Save”.

Then on the left side of the page, go to Main Menu → Payroll → Manage Monthly Provision.
Enter the desired salary Year and Month for all employees, and click “Filter”.
Then click the“Send to Quickbooks” and your provisions will be transferred as journals.

Troubleshooting
Quickbooks Events Status & Verifying Issues
To view all events and retry sending failed posts, go to User Menu → System Preferences → Integration Setup →Marketplace Integrations →QuickBooks.
On the Event Viewer page, click “Retry” to send journal entries again.
Just as with any integration between two platforms, having a monitoring tool is essential to oversee all events and activities. This tool plays a crucial role in tracking the outcomes of these events efficiently, which can be achieved through the Quickbooks Events Viewer on ZenHR.

TABLE OF CONTENTS
- Integrate Your ZenHR Account With QuickBooks
- ZenHR-QuickBooks Integration Setup
- Using the Integration
- Set Up GL Accounts:
- Add Payroll GL Accounts on ZenHR by following these steps:
- To Integrate Financial Transactions GL Accounts:
- To Integrate Loans GL accounts by following these steps:
- Add Overtime GL Accounts by following these steps:
- To Integrate Overtime GL accounts by following these steps:
- Add Vacation in-advance salaries GL account:
- To Integrate Overtime GL accounts by following these steps:
- Sync Employee Records:
- Post Journal Entries
- Posting Journal Entries
- Posting Payroll / Salaries from ZenHR to Quickbooks
- Posting Off-Cycle Payments From ZenHR to QuickBooks
- To auto-generate separate journals for off-cycle payments and post them with your payroll journal entries, follow these steps:
- To manually generate your off-cycle payments journal entries, follow these steps:
- Post Off-Cycle Vacation In-Advance Salaries From ZenHR to QuickBooks
- To auto-generate separate journals for off-cycle vacation in-advance salaries and post them with your payroll journal entries, follow these steps:
- To manually generate your off-cycle vacation in-advance journal entries, follow these steps:
- Posting Provisions From ZenHR to QuickBooks
- To auto-generate journals for provisions and post them with your payroll journal entries, follow these steps:
- To manually generate provisions journal entries, follow these steps:
- To manually generate provisions journal entries, follow these steps:
- Set Up GL Accounts:
- Troubleshooting
- Quickbooks Events Status & Verifying Issues
- TABLE OF CONTENTS
- Integrate Your ZenHR Account With QuickBooks
- ZenHR-QuickBooks Integration Setup
- Using the Integration
- Set Up GL Accounts:
- Add Payroll GL Accounts on ZenHR by following these steps:
- To Integrate Financial Transactions GL Accounts:
- To Integrate Loans GL accounts by following these steps:
- Add Overtime GL Accounts by following these steps:
- To Integrate Overtime GL accounts by following these steps:
- Add Vacation in-advance salaries GL account:
- To Integrate Overtime GL accounts by following these steps:
- Sync Employee Records:
- Post Journal Entries
- Posting Journal Entries
- Posting Payroll / Salaries from ZenHR to Quickbooks
- Posting Off-Cycle Payments From ZenHR to QuickBooks
- To auto-generate separate journals for off-cycle payments and post them with your payroll journal entries, follow these steps:
- To manually generate your off-cycle payments journal entries, follow these steps:
- Post Off-Cycle Vacation In-Advance Salaries From ZenHR to QuickBooks
- To auto-generate separate journals for off-cycle vacation in-advance salaries and post them with your payroll journal entries, follow these steps:
- To manually generate your off-cycle vacation in-advance journal entries, follow these steps:
- Posting Provisions From ZenHR to QuickBooks
- To auto-generate journals for provisions and post them with your payroll journal entries, follow these steps:
- To manually generate provisions journal entries, follow these steps:
- To manually generate provisions journal entries, follow these steps:
- Set Up GL Accounts:
- Troubleshooting
Was this article helpful?
That’s Great!
Thank you for your feedback
Sorry! We couldn't be helpful
Thank you for your feedback
Feedback sent
We appreciate your effort and will try to fix the article