Employee Shifts is the one place where you plan and track your employees' working hours. Depending on how a team works, you can give employees a fixed schedule that repeats every week, or plan their days one by one on a calendar grid. You can also let the AI Shift Planner draft a whole roster for you, so all you have to do is review it and publish it. This guide walks through the feature step by step: setting up your shift catalog, assigning shifts, and using the AI Shift Planner.
Getting to Employee Shifts
Main Menu → Time Management → Employee Shifts
The page opens with two tabs at the top:
Scheduling: for employees on a day-by-day roster.
Regular: for employees on a fixed, repeating schedule.
Which tab you use depends on how each employee is set up - the next section explains how to tell them apart.
Two Ways to Schedule
ZenHR supports two scheduling models, and every employee follows one of them. Use this table to work out which one fits each of your teams.
An employee is either a regular employee or a roster-based employee, never both at once.
Roster-based employees appear on the Scheduling tab and can only be given roster shifts.
Regular employees appear on the Regular tab and can only be given regular (non-roster) shifts.
Before You Start: Set Up Your Work Shifts
Every shift you assign, on either tab, comes from your branch's work shift catalog. Set this up first, before you assign anything.
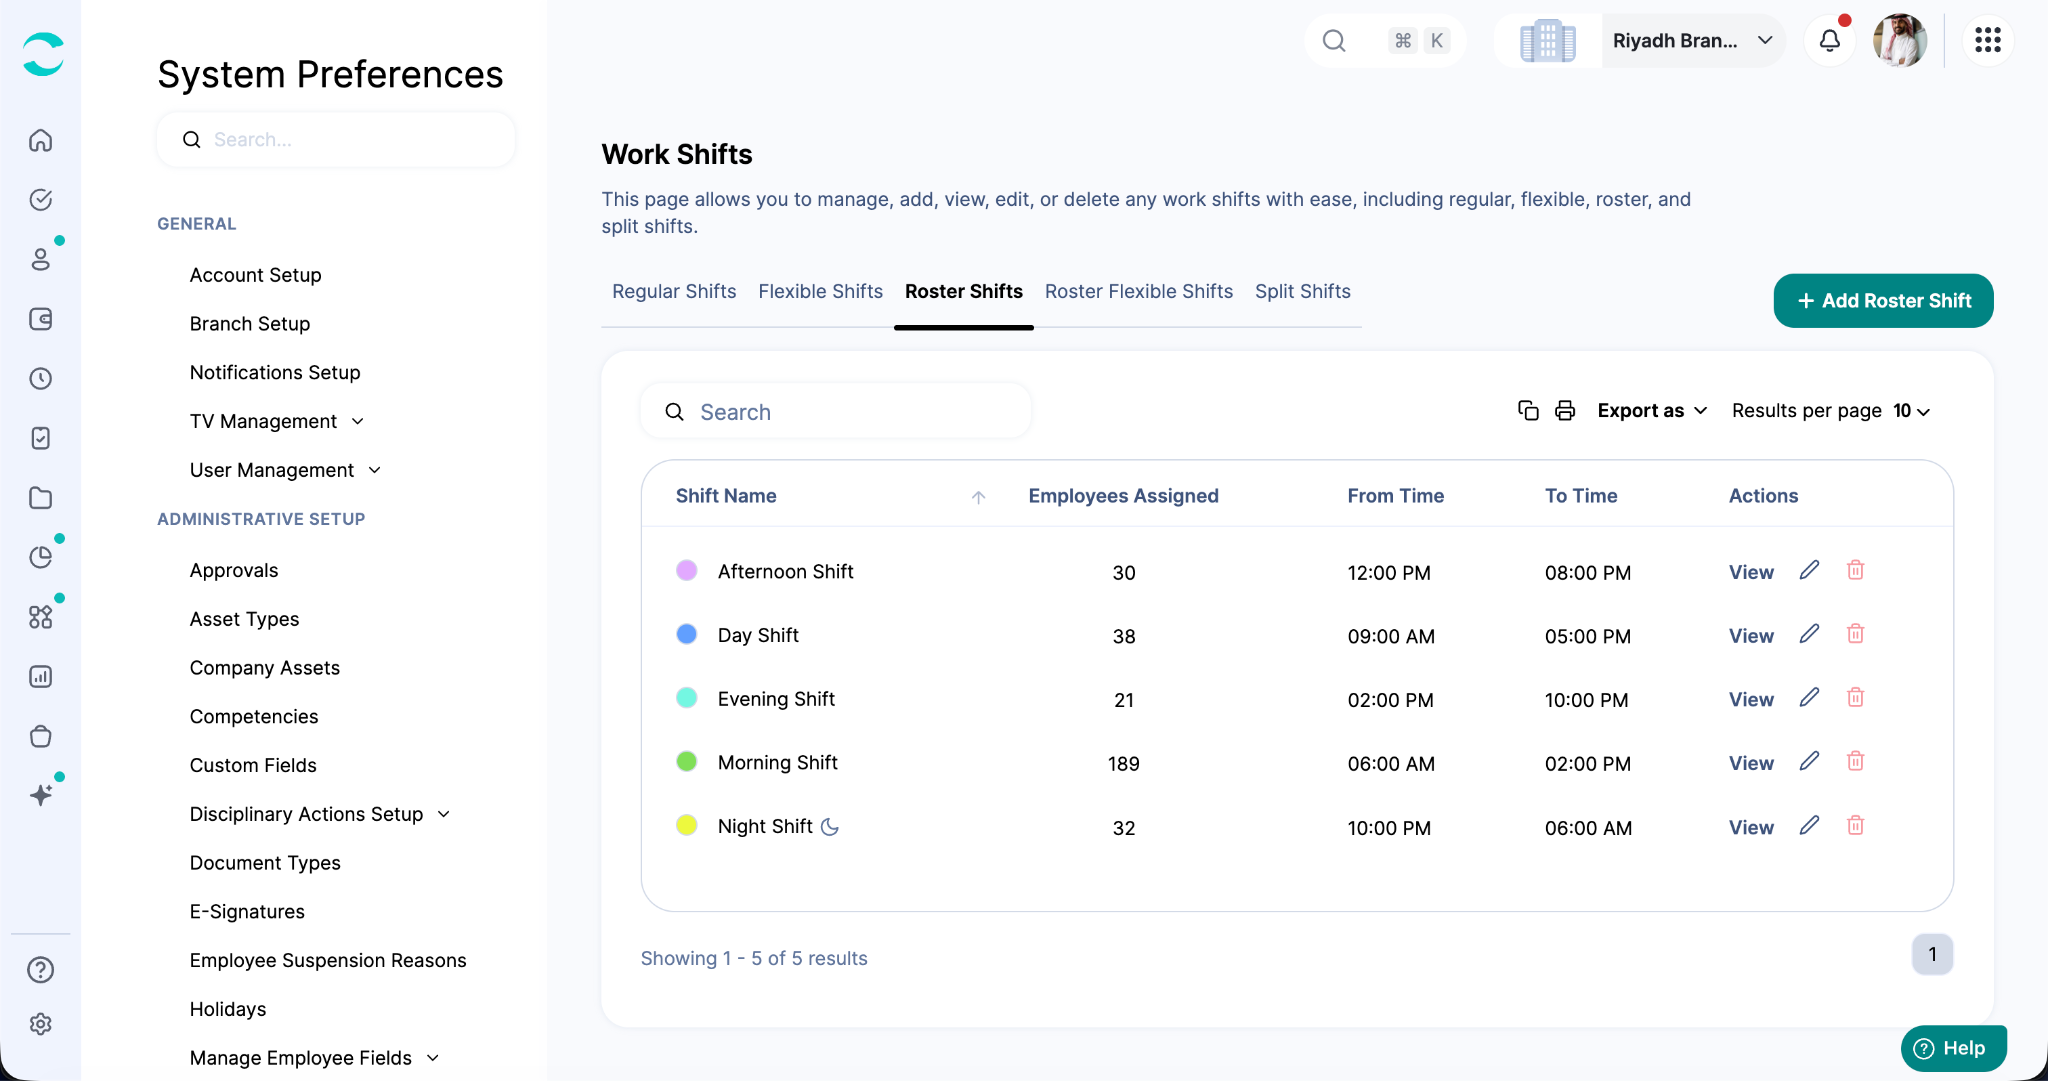
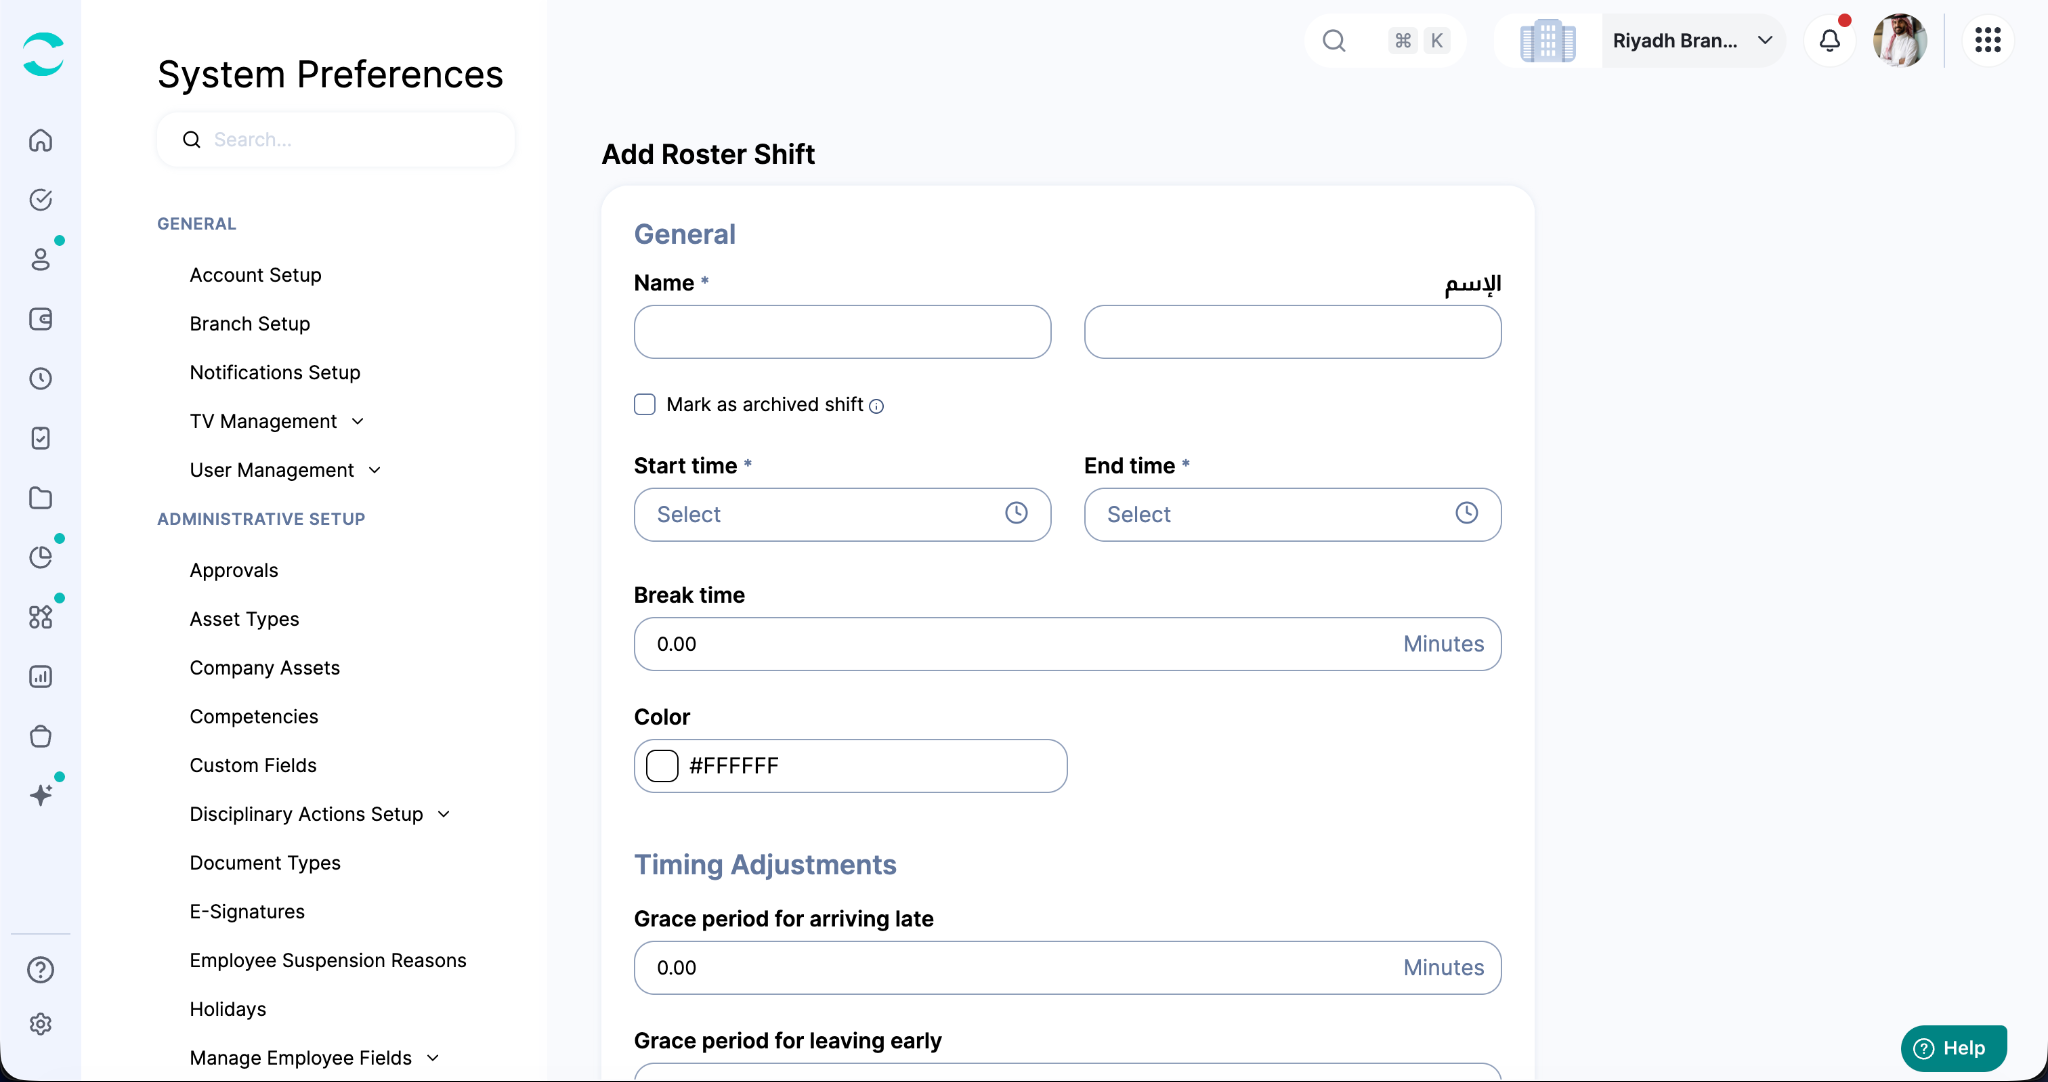
To Add a Work Shift
1. Homepage → Settings → Time Setup → Attendance → Work Shifts
2. Click the tab for the type of shift you want to add: Regular Shifts, Flexible Shifts, Roster Shifts, Roster Flexible Shifts, or Split Shifts.
3. Click “+ Add Shift”.
4. Enter the shift's name in English and Arabic, its start and end times, break time, and a color.
5. Set grace periods and any exceptions, if needed.
6. Click “Save”.
Choosing a shift type
Regular shift - a fixed start and end time (e.g., 8:00 AM – 5:00 PM). If the end time is earlier than the start time, ZenHR treats it as an overnight shift that rolls into the next day.
Flexible shift - a time window with a set number of required working hours somewhere inside it.
Roster shift - the shift types available on the Scheduling tab and to the AI Shift Planner.
Roster flexible shift - a flexible shift built for roster-based teams.
Split shift - made up of 2 to 5 separate time blocks within a single day.
Good to know: once a shift has employees assigned to it, its times, breaks, and days off become locked to protect attendance history - and a shift cannot be deleted while anyone is assigned to it. To change a shift that's in use, create a new one and archive the old one.
Every branch also has a built-in Day Off shift used to mark rest days on the roster. It is system-managed, counts as zero working hours, and cannot be edited.
The Regular Tab: Fixed Shift Assignments
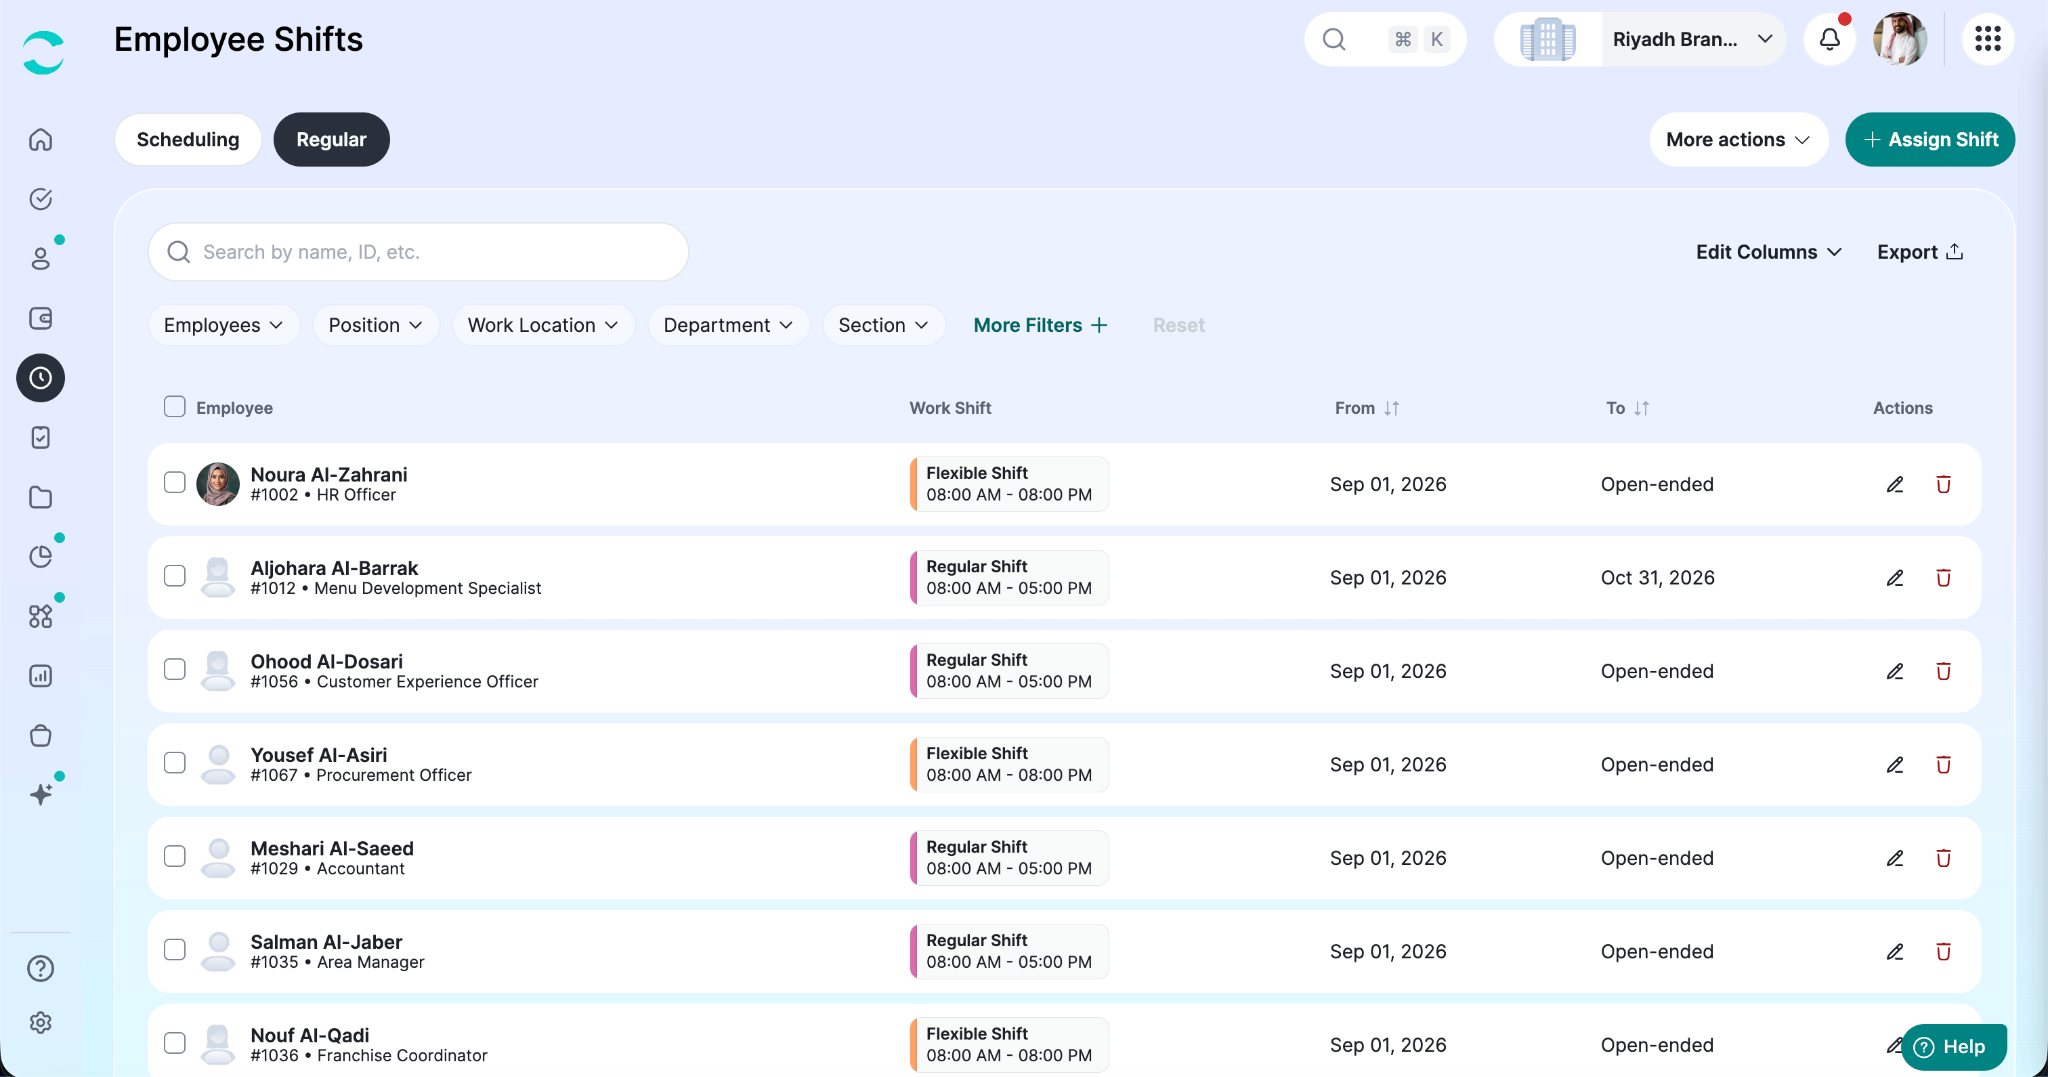
The Regular tab lists every fixed shift assignment as a row: the employee (with employment number and job role), the assigned work shift with its hours, and the assignment's From and To dates. An assignment with no end date shows as Open-ended. You can sort by the From and To columns, choose which columns to display with Edit Columns, and set how many rows appear per page.
How to Assign a Shift
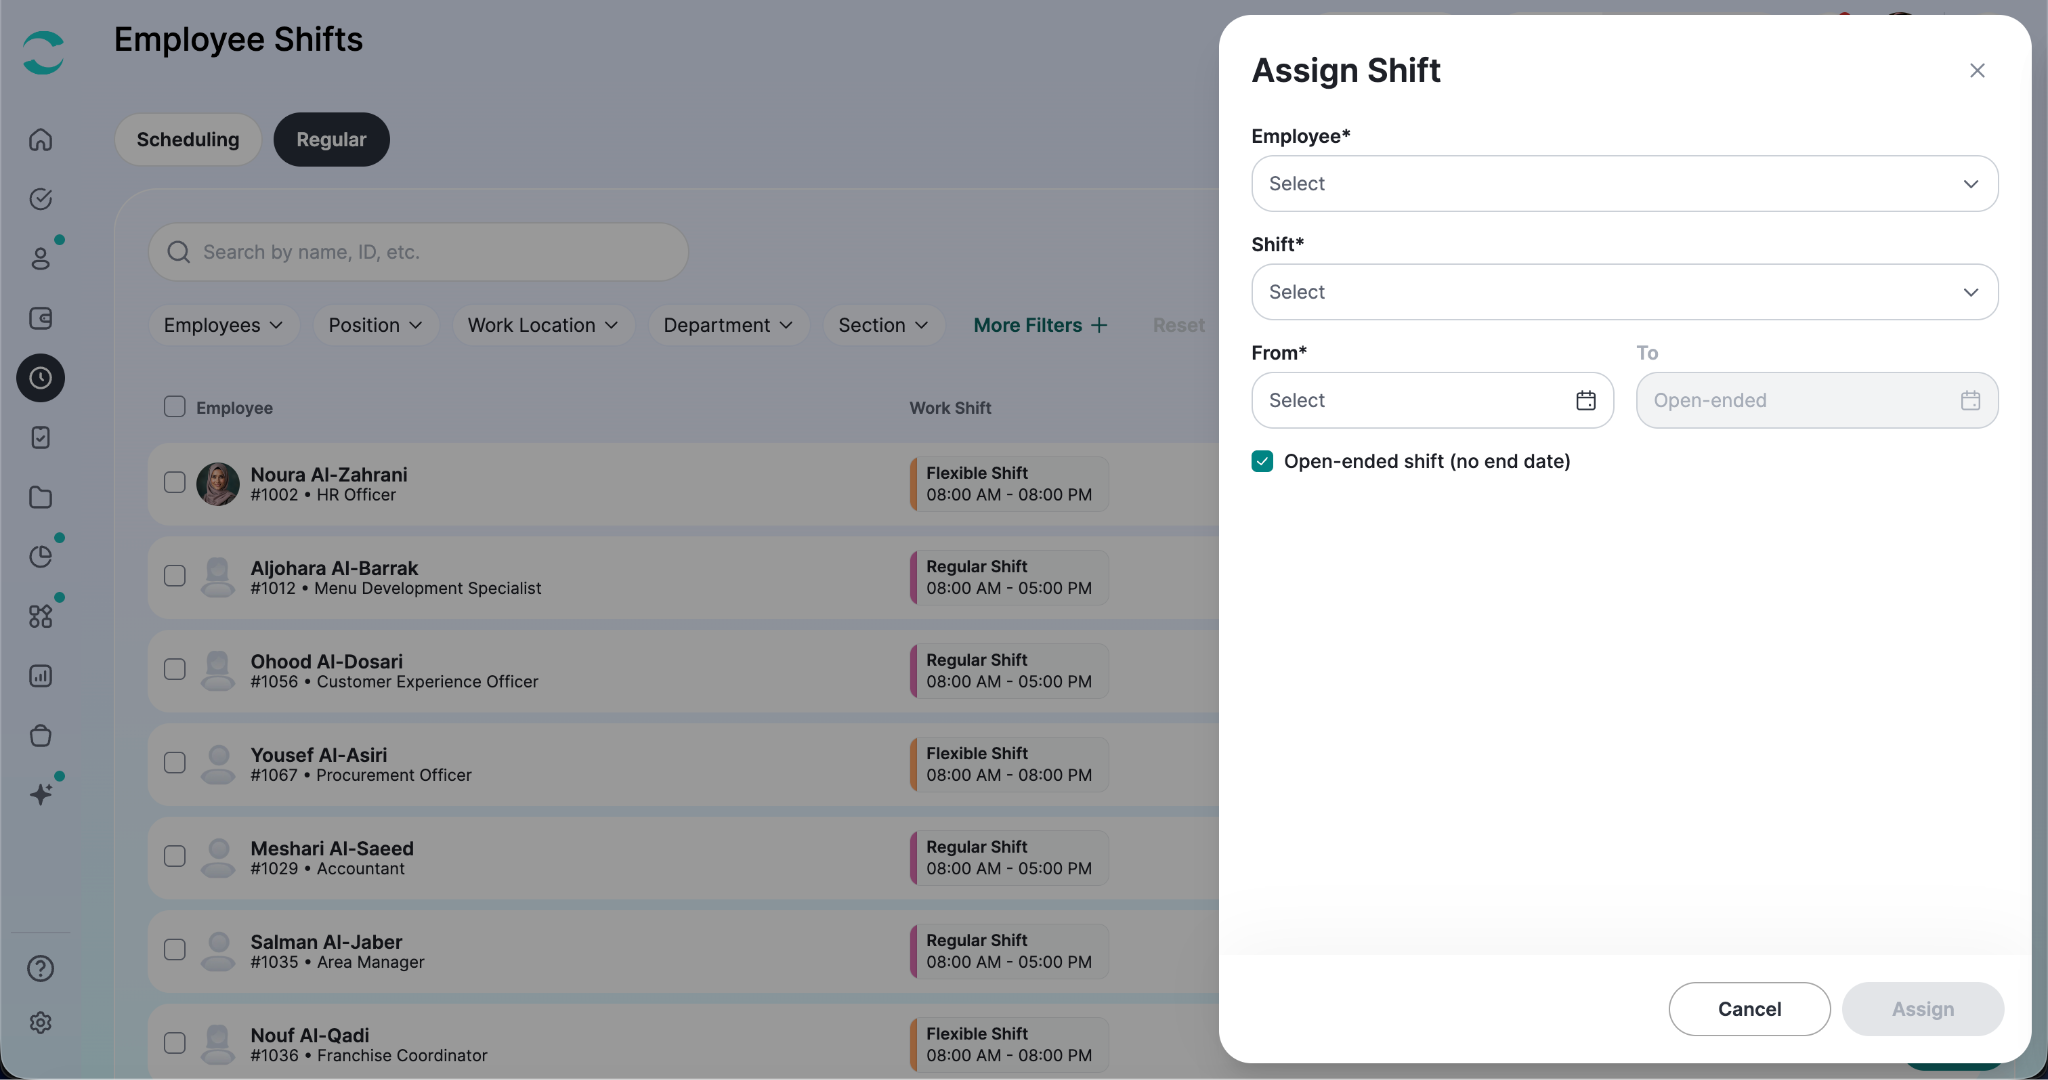
Click “+ Assign Shift”.
Choose the Employee (the list only shows regular, non-roster employees).
Choose the Shift from your regular shift catalog, each option shows its working hours
Set the From date, then either set a To date or tick Open-ended shift (no end date).
Then click “Assign”.
To change an existing assignment, click the pencil icon. You can update the shift and dates (the employee is fixed).
ZenHR protects your data with a few automatic checks: an assignment can't start before the employee's hiring date or run past their termination, can't overlap another assignment for the same employee, and can't clash time-wise with an adjacent day's shift (relevant for overnight shifts).
Bulk Assigning
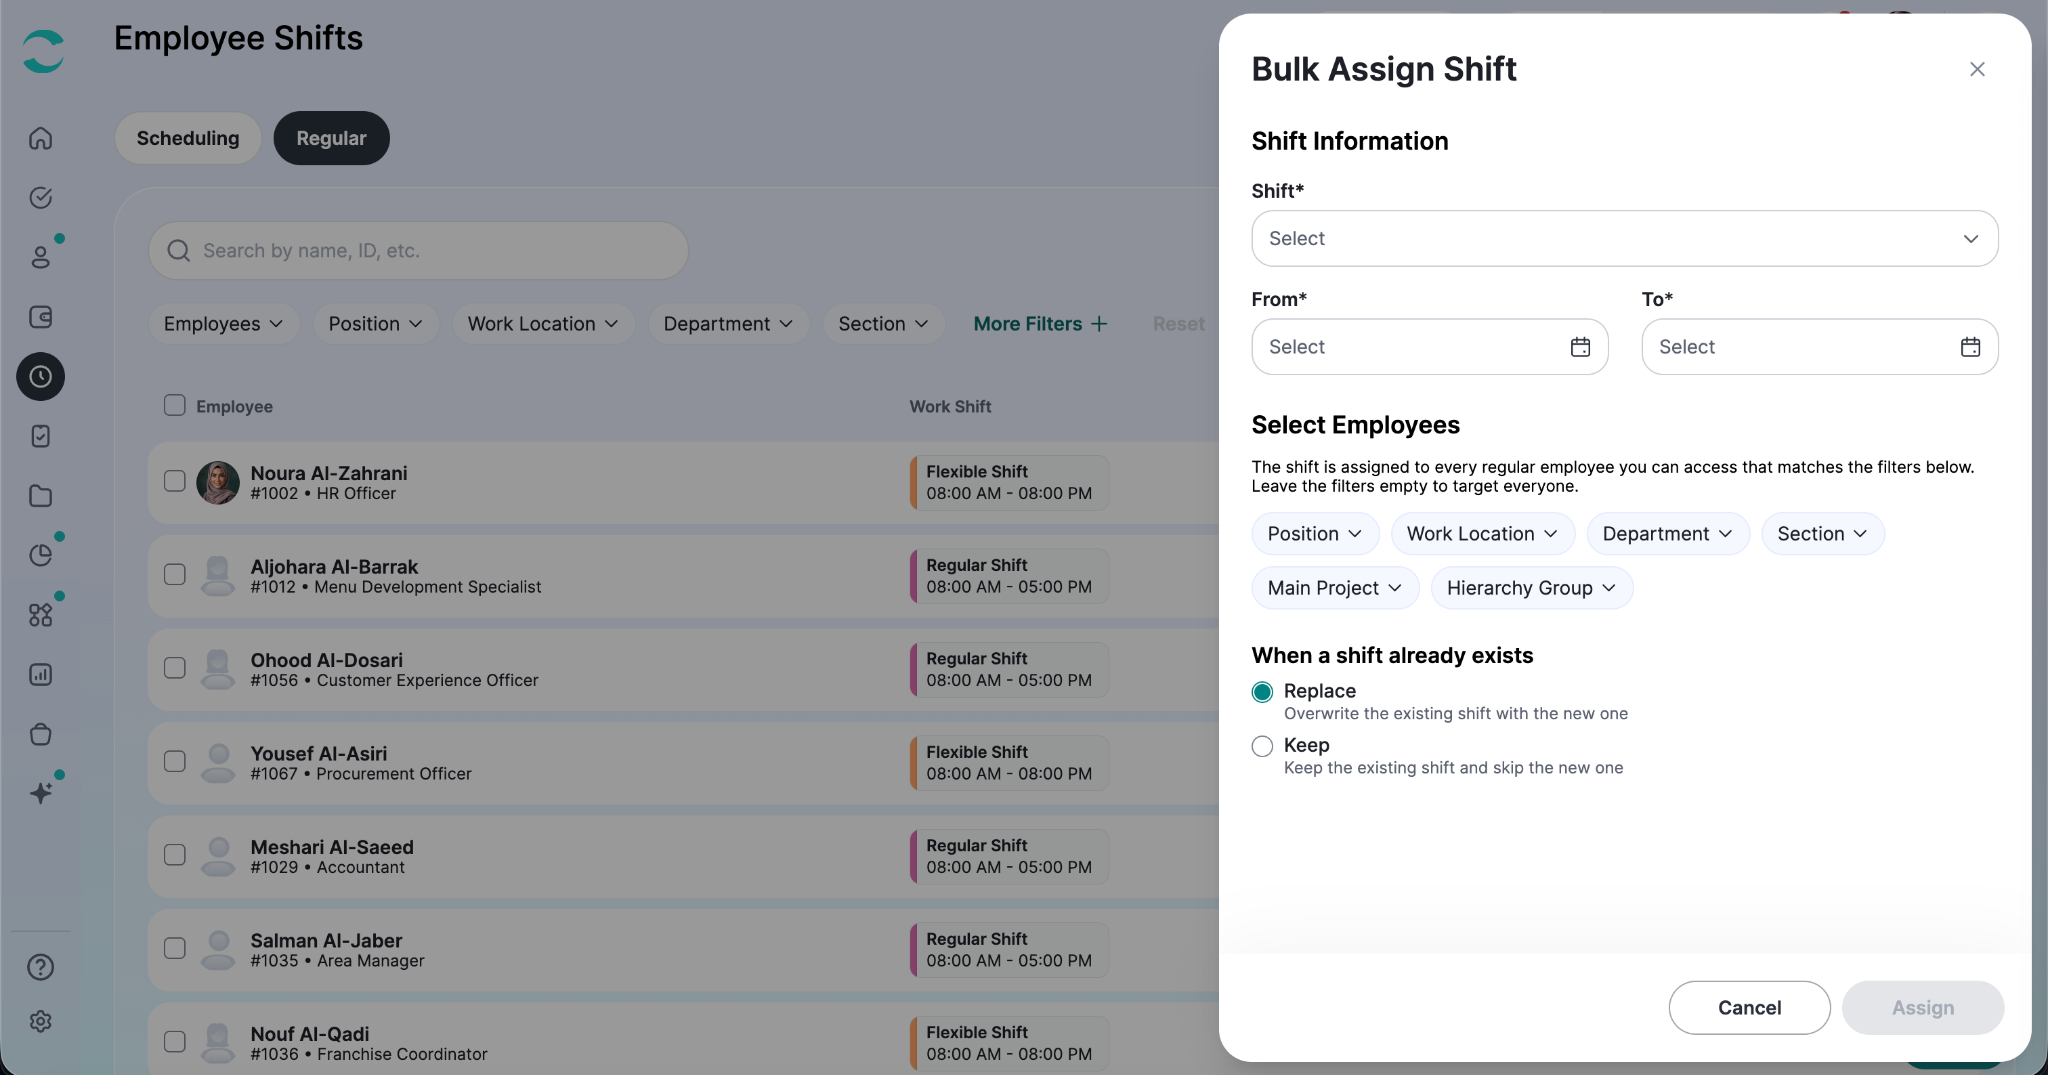
Use Bulk Assign Shifts when you want to assign the same shift to multiple employees at once.
Go to More actions → Bulk Assign Shifts
Choose the From and To dates.
Use the filters to choose which employees the shift should be assigned to. You can filter by:
Position
Work location
Department
Section
Main project
Hierarchy group
If you leave all filters empty, the shift will be assigned to all regular employees you have access to.
Choose what ZenHR should do if an employee already has a shift during the selected period:
Replace: Replace the existing shift with the new one.
Keep: keep the employee's current shift and skip the new assignment.
The bulk assignment is processed in the background. Once it is complete, the new shifts will appear on the page. ZenHR automatically considers each employee's hiring and termination dates.
Deleting Shift Assignments
To delete one assignment, click the trash icon next to it.
To delete multiple assignments:
Select the assignments using the checkboxes.
Choose the delete option.
If you select all rows on the current page, you can also choose to select all assignments that match your current search and filters.
You will be asked to confirm before deleting.
Note: Deleted shift assignments cannot be restored.
Searching, Filtering, & Exporting
Use the search box to find an employee by name or employee ID.
You can also filter the list by:
Employee
Position
Work location
Department
Section
Hierarchy group
Business unit
Division
Segment
Main project
Work type
Work shift
Employee status
Date range
Use Export to:
Download the current view as Excel
Download it as PDF
Print it
Importing Assignments
You can assign shifts to employees in bulk using a spreadsheet.
Go to More actions → Import Shifts, then:
Download the provided template.
Fill in the required shift information.
Upload the completed file.
Supported file types are .xlsx, .xls, and .csv, with a maximum file size of 5 MB.
The import is processed in the background. Once it is complete, the table will update with the new assignments.
The Scheduling Tab: Managing Roster Shifts
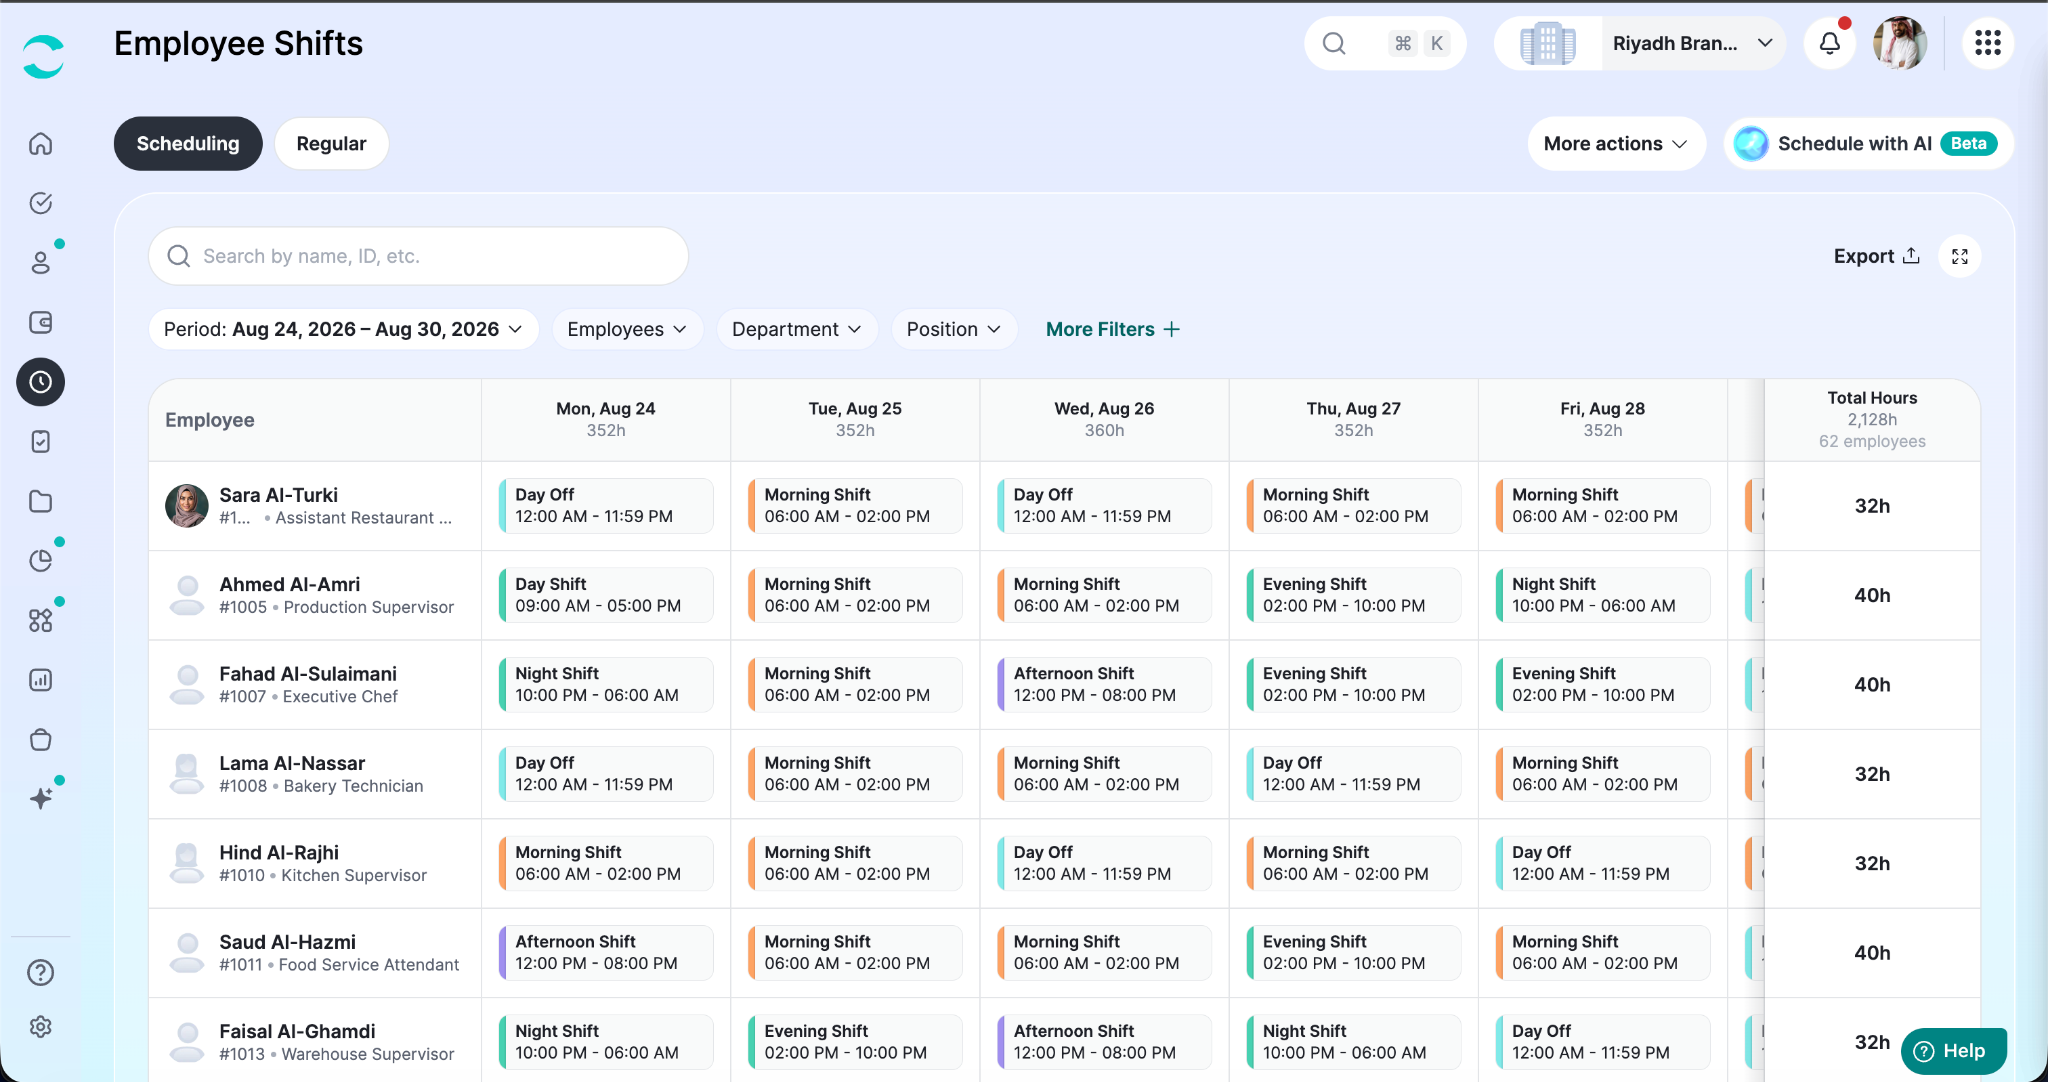
The Scheduling tab is used to manage employees who work on roster-based schedules.
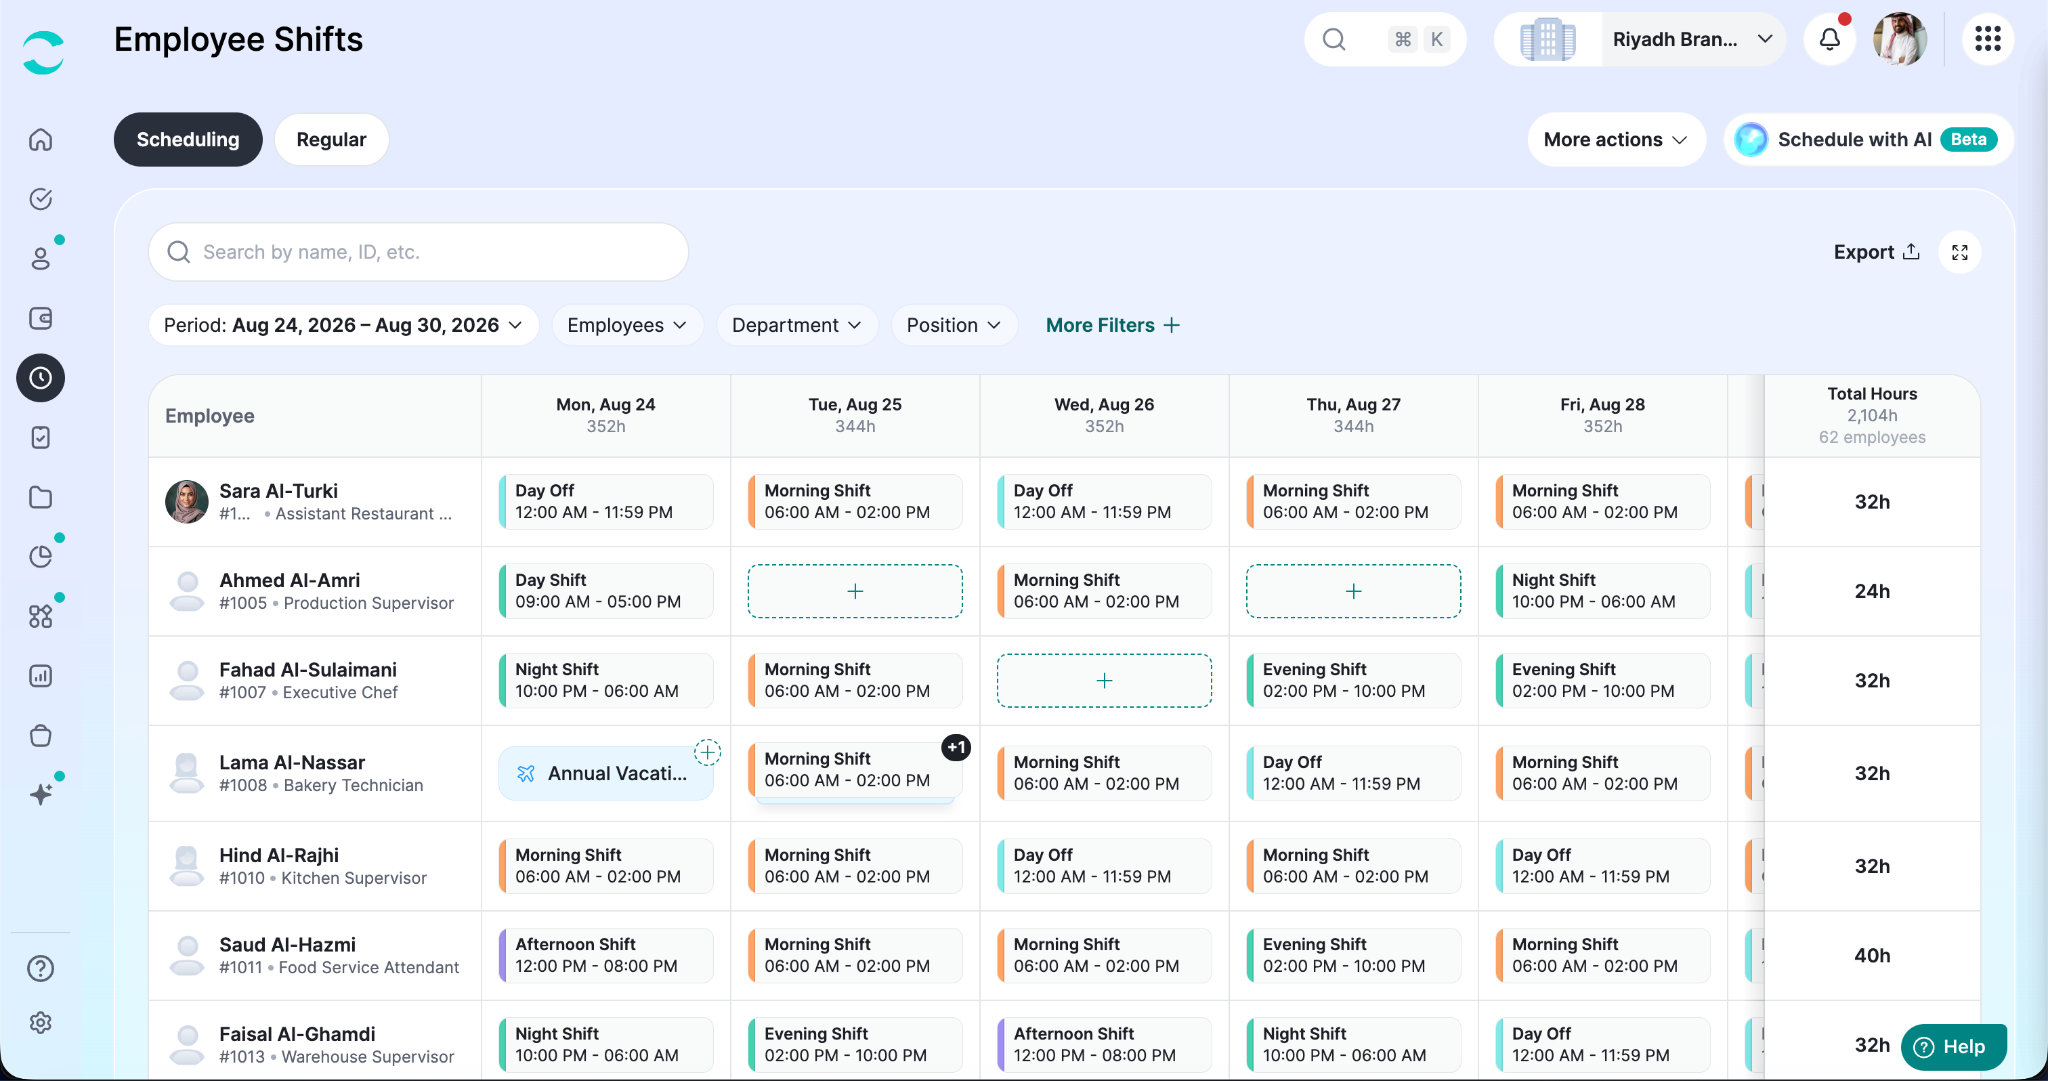
The schedule appears as a calendar grid:
Each employee has their own row.
Each day appears as a separate column.
Employee details include their name, employee number, and job role.
Each day shows the total number of scheduled hours.
The Total Hours column shows each employee's total scheduled hours for the selected period.
The top of the grid also shows the total scheduled hours and number of employees.
Choosing the Schedule Period
Use the Period filter to choose which dates you want to view and manage.
By default, the page shows the next 7 days. You can view up to 3 months at a time.
Dates are displayed using your branch's date format.
Understanding the Schedule Grid
Each cell in the grid shows the employee's schedule for that day.
You may see:
Shift: Shows the shift name, color, and working hours.
Day Off: Shows that the employee is not scheduled to work. It counts as zero working hours.
Public holiday or approved time off: Shows the holiday or leave type. You can still manually assign a shift on these days if needed.
Terminated: Shows that the employee is no longer active. You cannot assign a shift to these days.
Empty cell: No shift has been assigned yet. Click the cell to add one.
Past dates appear dimmed, but you can still edit them.
If a shift is added on a public holiday or approved time-off day, both will appear in the cell. A +1 indicator lets you view the additional information.
Adding, Changing, or Removing Shifts
To assign a shift:
Click an empty cell.
Search for a roster shift by its name or working time.
Select the shift you want to assign.
To change an existing shift, click the cell and select another shift.
To remove it, click the cell and choose “Remove Shift”.
Changes made manually on the schedule are saved immediately.
Drag & Drop to Moving or Swap Shifts
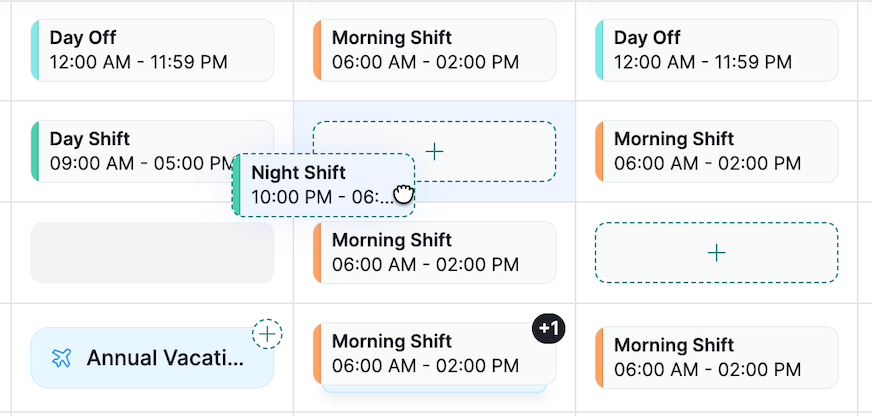
You can use drag and drop to quickly update the schedule.
Drag a shift to an empty cell to move it.
Drag a shift to a cell that already has another shift to swap the two shifts.
Before a swap is completed, ZenHR shows you which employees and shifts will be changed and asks you to confirm.
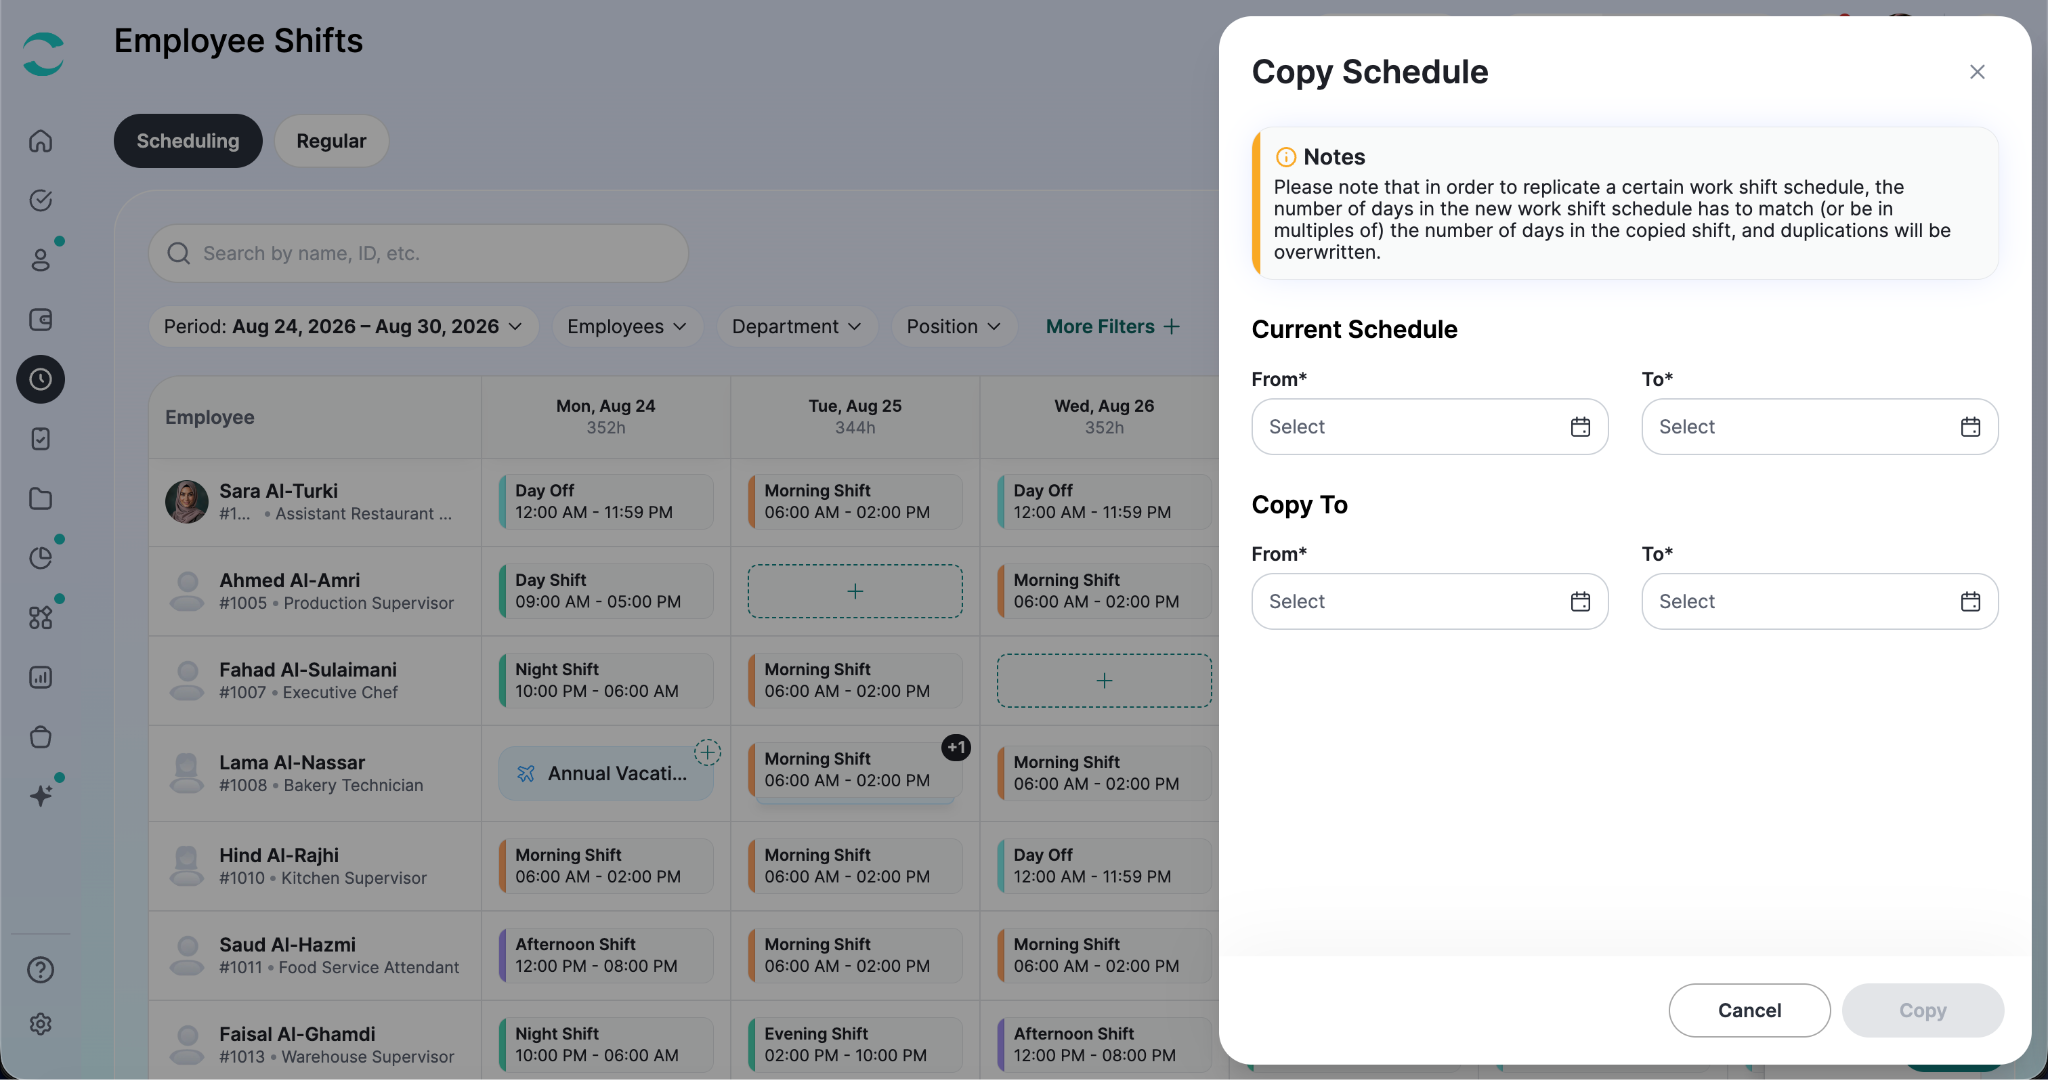
Copying a Schedule
If you want to repeat an existing schedule, you can copy it to another period instead of creating it again.
Go to More actions → Copy Schedule, then:
Choose the schedule period you want to copy.
Choose the period you want to copy it to.
Review the dates before confirming.
The new period must either:
Be the same length as the original period, or
Be an exact multiple of it.
For example, you can copy a 1-week schedule into the next 4 weeks, and ZenHR will repeat the schedule four times.
Note: Any existing shifts in the new period will be replaced.
Notifying Employees About Their Shifts
Once the schedule is ready, you can notify employees about their assigned shifts.
Go to More actions → Notify People.
ZenHR will send employees their published schedule through:
In-app notifications
Email
Mobile push notifications
After sending, you will see how many employees were notified.
Importing & Exporting the Schedule
Importing
Go to More actions → Import Shifts to upload roster shifts using a spreadsheet.
Download the template provided by ZenHR. It will already include the period currently displayed on the schedule.
Complete the template and upload it to add the shifts.
Exporting
Use Export to:
Download the schedule as Excel
Download it as PDF
Print it
You can also turn on Full Screen to get more space when working with large schedules.
Switching Employees Back to Regular Shifts
If your branch no longer wants to use roster scheduling, you can switch roster employees back to regular shifts.
Go to: More actions → Switch to regular shifts
Note: This will remove the employees' existing roster shift assignments, and the action cannot be undone. ZenHR will ask you to confirm before making the change.
Searching and Filtering the Schedule
Use the search box to find employees by name or employee ID.
You can also filter the schedule by:
Employee
Department
Position
Work location
Section
Hierarchy group
Business unit
Division
Segment
Main project
Manager
Gender
Whether the employee already has a schedule during the selected period
AI Shift Planner (Beta)
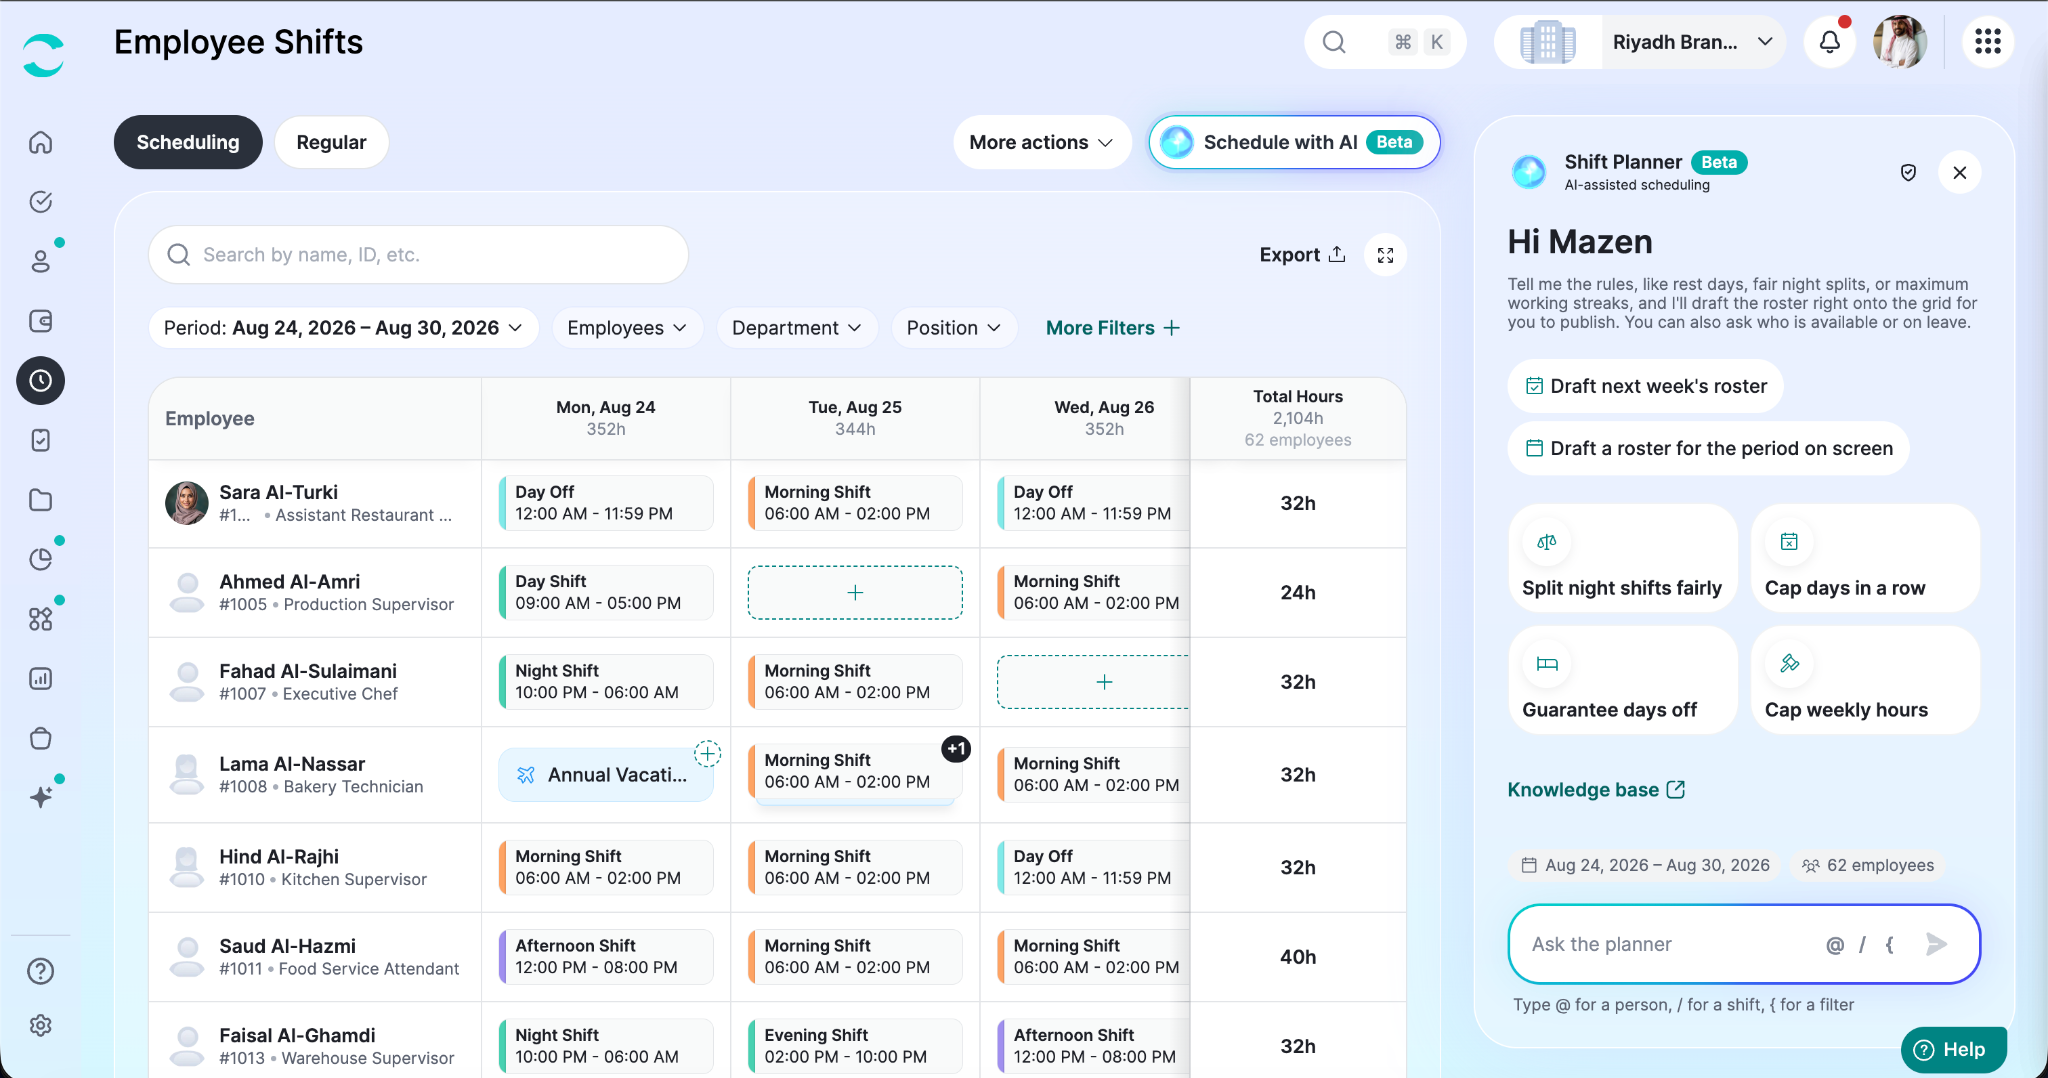
The AI Shift Planner helps you create roster schedules automatically.
Instead of assigning every shift manually, you can describe your scheduling requirements in English or Arabic. The planner will create a draft schedule based on your instructions.
You can then review and edit the draft before publishing it.
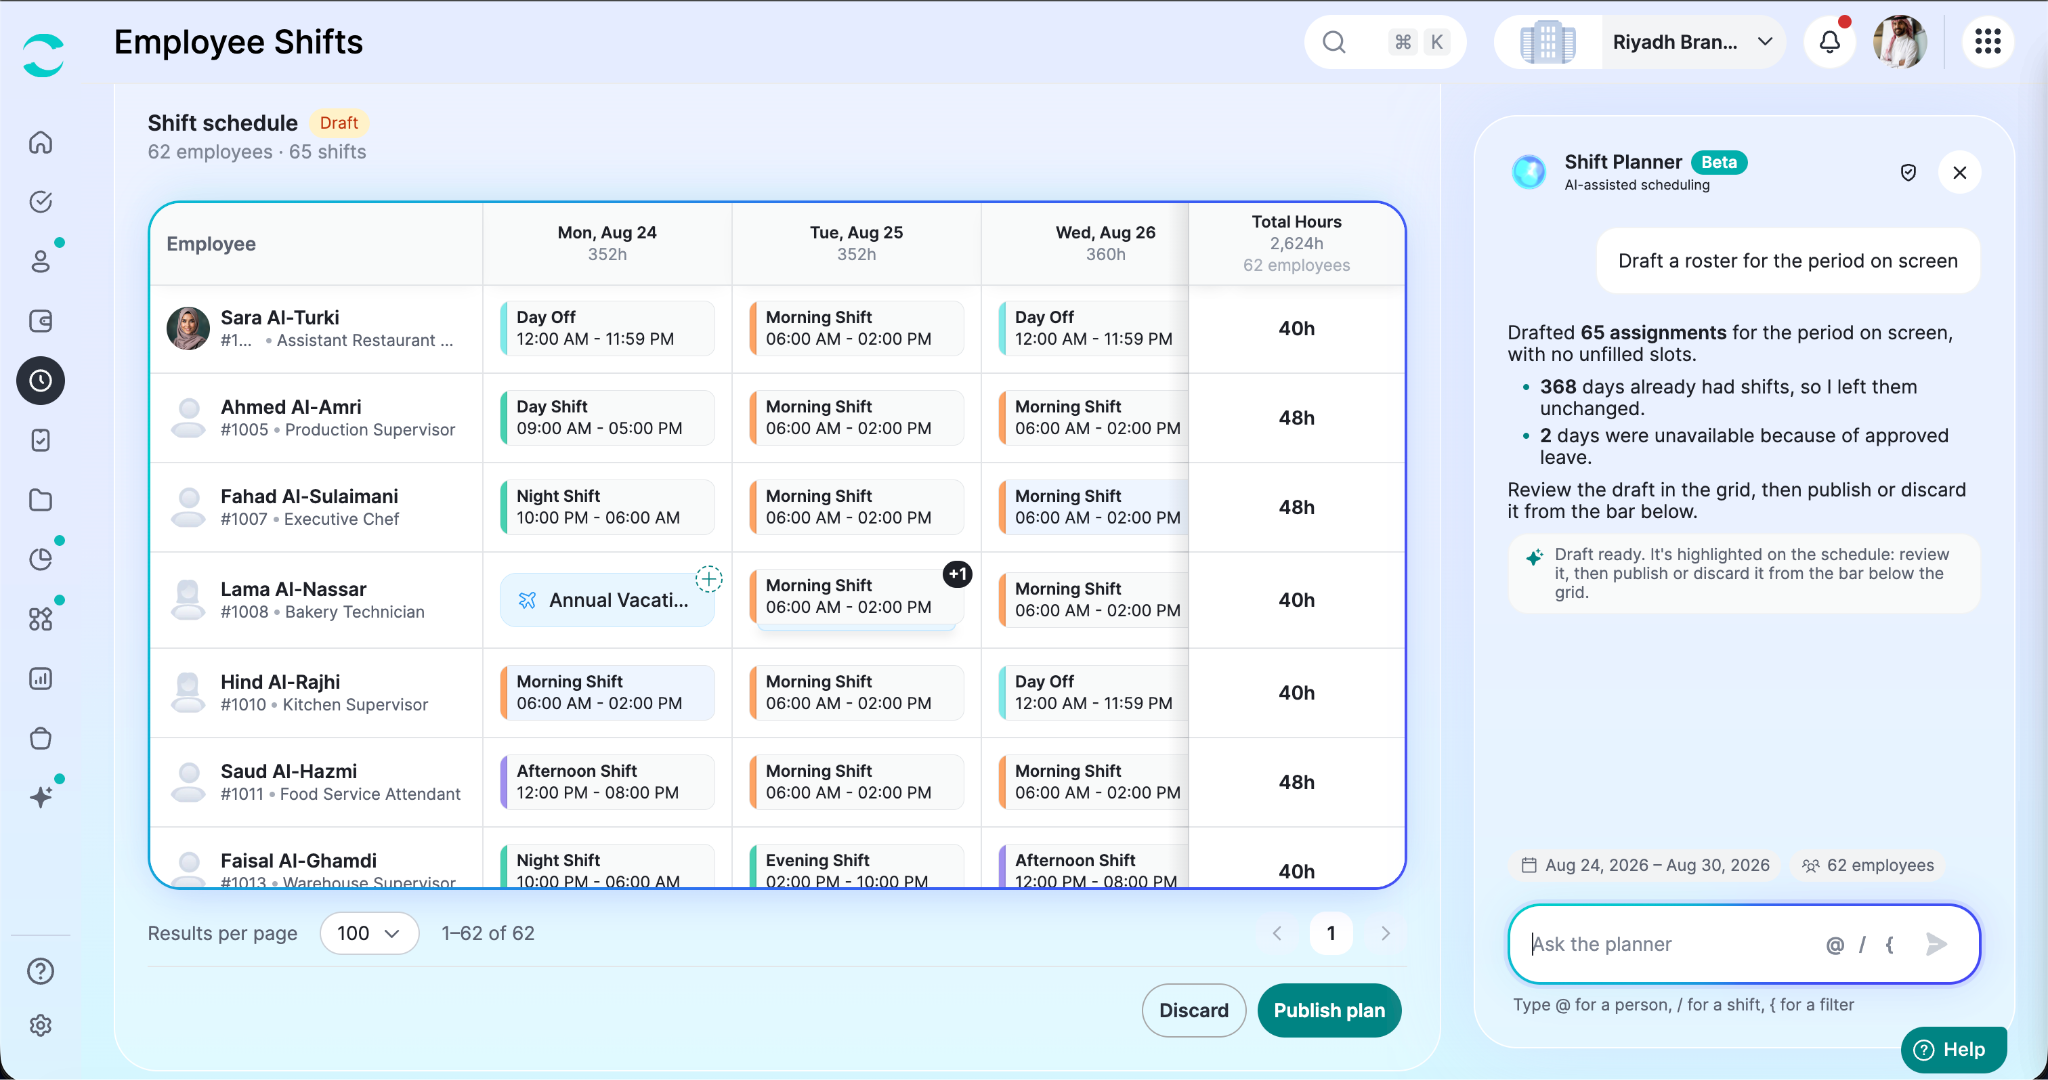
Nothing is published until you choose “Publish plan”.
Enabling the AI Shift Planner
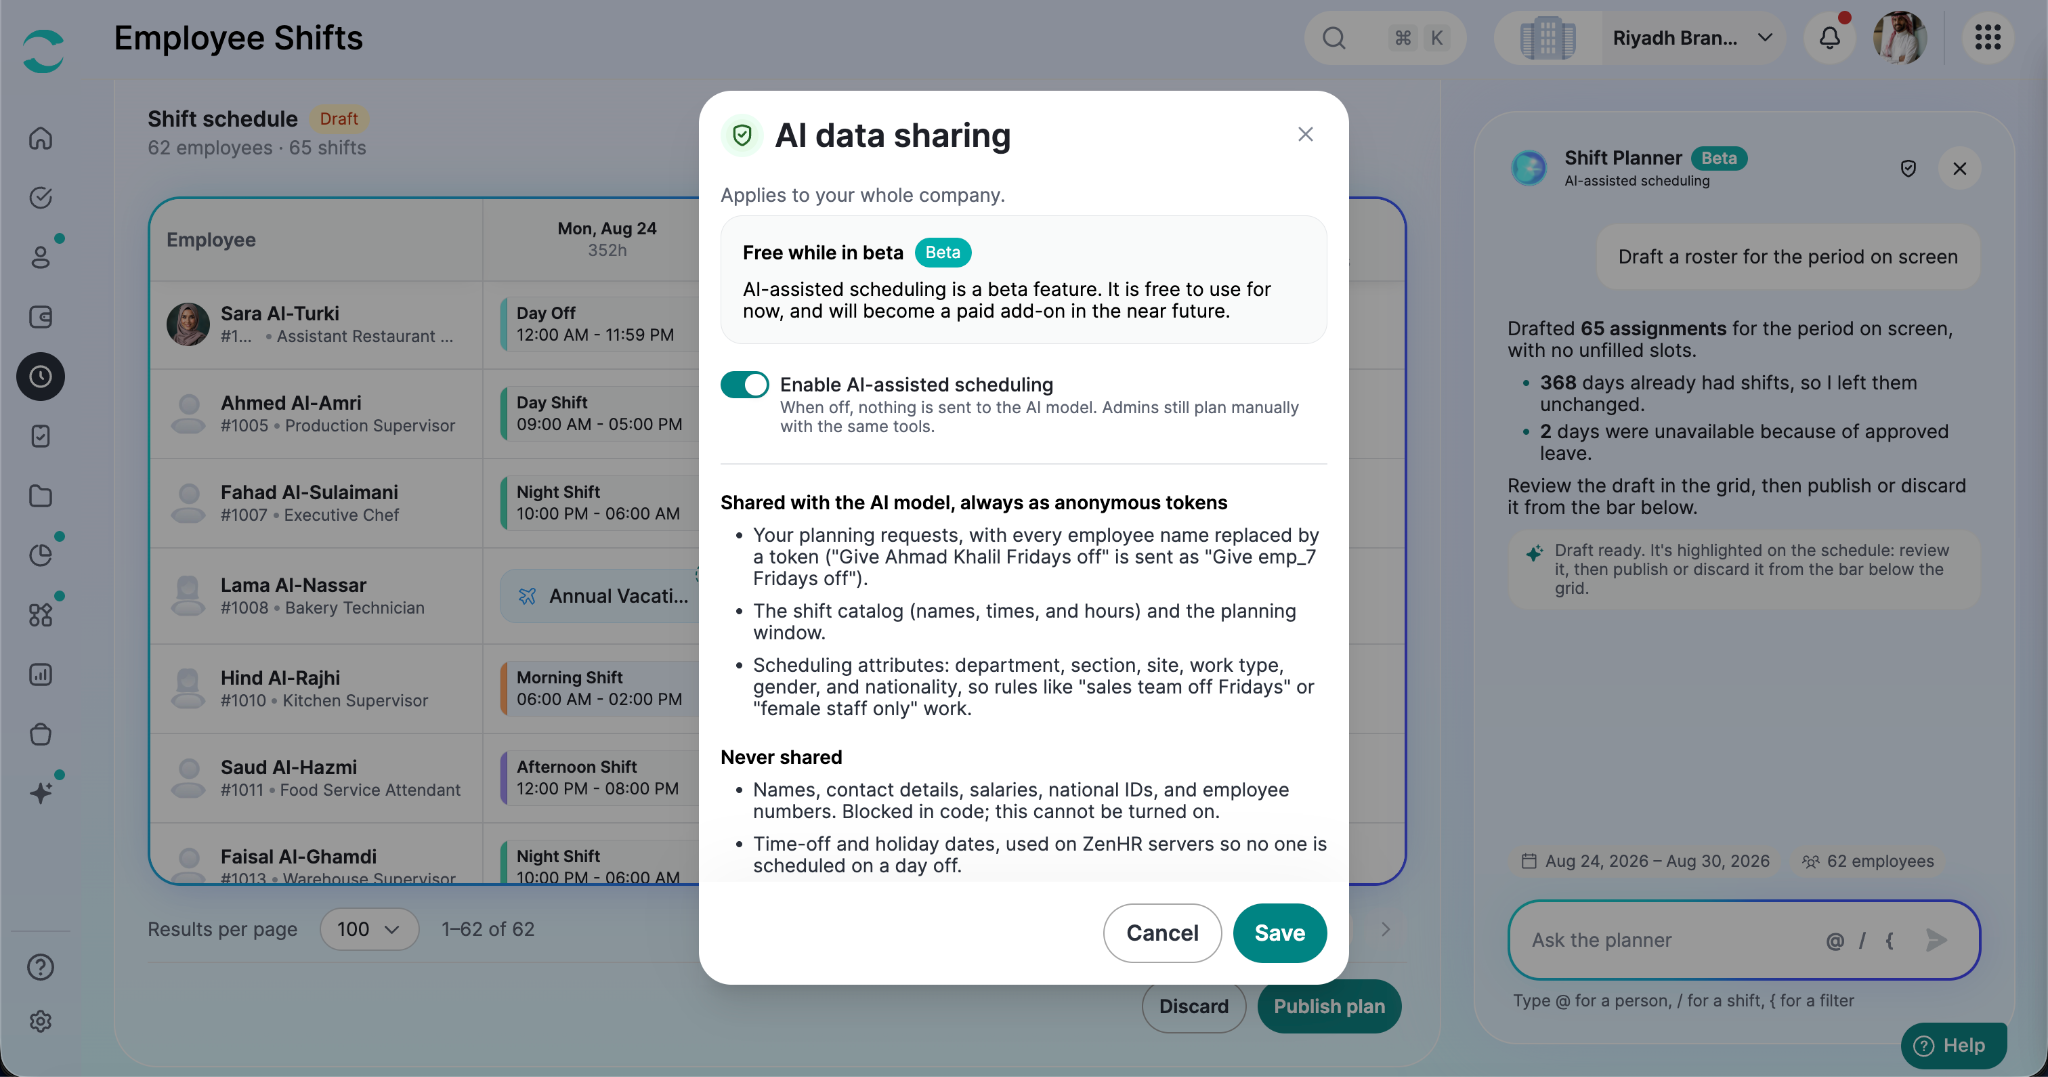
Before employees can use the AI Shift Planner, a Super Admin must enable AI-assisted scheduling from the AI data sharing settings.
You can access these settings from the shield icon in the AI Shift Planner.
This setting applies to the whole company.
Users also need the required Shift Planner permissions to use the feature.
Creating a Schedule With AI
On the Scheduling tab, click Schedule with AI.
The AI Shift Planner uses:
The period currently selected on the schedule
The employees included in your current filters
For example, if you filter the schedule to one department before opening the planner, the AI will create a schedule only for employees in that department.
You can start by choosing a suggested action, such as:
Draft next week's roster
Draft a roster for the period on screen
You can also choose one of the suggested scheduling rules or write your own request.
For example:
"Split the night shifts fairly across the team."
"Make sure everyone gets 2 days off per week."
"No one works more than 5 days in a row."
"Keep weekly hours under 48."
"Give Sara the morning shift on Mondays."
While writing your request, you can use:
@ to select a specific employee
/ to select a shift
{ to add a filter, such as a department
Your selections will appear directly inside your request.
You can also ask the planner questions, such as who is available or who is on leave next week.
If you close the planner, your conversation is kept. You can reopen it and continue where you left off.
What You Can Ask the AI Shift Planner to Do
You can give the planner different types of scheduling rules.
Shift Coverage
Set the minimum or maximum number of employees needed for a specific shift each day.
Working Hours
Set rules such as:
Maximum weekly working hours
Minimum weekly working hours
Minimum rest time between shifts
Working Days
Set rules such as:
Maximum number of consecutive working days
Required days off each week
Required free weekends
Fair Scheduling and Rotation
Ask the planner to:
Distribute night shifts fairly
Rotate shifts between employees
Consider employee seniority
Keep schedules as consistent as possible
Specific Employee or Shift Rules
You can also:
Assign a specific employee to a shift on a certain date
Prevent an employee from working a specific shift
Prevent an employee from working on a specific day
Keep a group of employees on the same shift
Add preferred or avoided shifts for an employee
These rules can apply to everyone, a specific group or department, or individual employees.
Rules the AI Shift Planner Applies Automatically
Some scheduling rules are always applied, even if you do not include them in your request.
The AI Shift Planner will:
Assign no more than one shift per employee per day.
Avoid scheduling employees during approved time off.
Avoid scheduling employees on public holidays.
Avoid scheduling employees on suspension days.
Never replace shifts that have already been published.
If your request goes beyond the normal working-time limits for your country, the planner will tell you and ask you before creating the draft.
Reviewing the AI Draft
Once the planner finishes, the proposed shifts appear on the schedule as highlighted draft shifts.
You will also see a summary showing:
How many employees are included
How many shifts were created
Updated scheduled-hour totals
If the planner could not apply one of your instructions, it will explain why. For example, two rules may conflict, or an employee name may not match anyone in the system.
You can edit the draft before publishing it. You can:
Click a draft shift to change or remove it.
Drag draft shifts to different cells.
These actions work the same way as editing the normal schedule.
AI Shift Planner Limits
Keep the following limits in mind:
One AI draft can cover up to 1 month.
You can create schedules up to 1 year in advance.
Only one AI schedule can be published at a time for each branch.
Your Data and the AI Shift Planner
The AI Shift Planner is designed to protect employee information.
Before scheduling information is sent to the AI model, employees are replaced with anonymous identifiers.
For example: "Give Ahmad Fridays off"
may be sent to the AI as:
"Give emp_7 Fridays off"
The AI model only receives the information needed to create the schedule, including:
Your scheduling instructions
Shift names, times, and hours
The scheduling period
Scheduling information needed to apply your rules, such as department, section, site, work type, gender, and nationality
Employees are represented using anonymous identifiers.
The following information is never shared with the AI model:
Employee names
Contact details
Salaries
National IDs
Employee numbers
Time-off and public holiday dates remain on ZenHR's servers and are only used to prevent the AI from scheduling employees on unavailable days.
Super Admins can review or disable AI-assisted scheduling at any time through the AI data sharing settings.
When the feature is disabled, no information is sent to the AI model, and schedules can still be created manually.
Important Notes
Roster employees can only be assigned roster shifts.
Regular employees can only be assigned regular shifts.
An employee's scheduling type is set from their employee profile or through the employee importer.
The Scheduling grid can show up to 3 months at a time.
AI-generated drafts can cover up to 1 month at a time.
Manual schedule changes are saved immediately.
AI-created schedules must be reviewed and published before they become active.
Public holidays and approved time off are shown on the schedule but do not prevent manual scheduling.
The AI Shift Planner will not schedule employees during public holidays or approved time off.
Roster days off use the built-in Day Off shift and count as zero working hours.
If you need to change a work shift that already has employees assigned to it, create a new shift and archive the old one.
Employees can view their assigned shifts from their ZenHR profile and the mobile app.
Use Notify People when you want to actively send employees their published schedules.
Was this article helpful?
That’s Great!
Thank you for your feedback
Sorry! We couldn't be helpful
Thank you for your feedback
Feedback sent
We appreciate your effort and will try to fix the article